Tutorial: Cargo Pants Pockets – 4 different ways! (Last in the 4 part series)
- At February 02, 2013
- By Kelly
- In Tutorials and Sew Alongs
 1
1
This tutorial is the final one in a series of four that shows how to make 4 different kinds of cargo pockets to add to pants. This handy how-to was contributed to Sewing Mamas by Monica (Mnemonics on the forum).
To add these pockets to pants, sew the outer leg seam of the pants pocket and then sew the pocket in place on the side. Sew the inner leg seam after the pocket is attached. For each pocket, the starting fabric size is given, but feel free to adjust the size to your liking for the pants you are making.
Four Different Cargo Pockets – Pocket Four: Pouch Style Pocket
I cut the fabric for this pocket at 9″ x 9″

Turn the top end under and sew.

Fold up the fabric at the corner matching raw edges. Mark the depth you want the pocket to be plus seam allowance – I used 1 1/2″. Mark a straight horizontal line on the fabric. Repeat this for the other end of the pocket too.

Sew both ends where you markings are. Turn the pocket right side out – this is what your pocket looks like right now.

Turn under seam allowances on the three edges of the pocket. Press with iron.

Place pocket on the desired place on pant piece. Pin in place and sew (easier said than done :-)). This shows the top view of the finished pocket.

Bottom view of the finished pocket. You can stitch the top side edges down if you want the top of the pocket to lie flat.

Cargo pocket 4 is ready….. and now you know how to make four different kinds of cargo pockets for pants!
Happy Sewing!
Kelly
<--- Back to Part 3 in this series ** OR – grab a pdf of the whole series from our Downloads!
Tutorial: Cargo Pants Pockets – 4 Different Ways! (Part 3 of 4)
- At February 01, 2013
- By Kelly
- In Tutorials and Sew Alongs
- 0
This tutorial is part three in a series of four that shows how to make 4 different kinds of cargo pockets to add to pants. This handy how-to was contributed to Sewing Mamas by Monica (Mnemonics on the forum).
To add these pockets to pants, sew the outer leg seam of the pants pocket and then sew the pocket in place on the side. Sew the inner leg seam after the pocket is attached. For each pocket, the starting fabric size is given, but feel free to adjust the size to your liking for the pants you are making.
Four Different Cargo Pockets – Pocket Three: Fold to the Left, Fold to the Right
I cut the fabric for this pocket at 7 1/2″ x 9″

Turn the top edge under and sew

Fold under seam allowance on the other 3 edges and press with iron.

Fold the the left and right sides of the pocket over to the size you want the finished pocket to be. I turned it under 1 1/2″. Press with iron.

Topstitch the left and right edges.

Open out the edges of the pocket at left and right.


You will sew the edges of the pocket to your pant piece by placing it underneath the topstitched fold of the pocket on either side. Hopefully that will make sense as you look at the rest of these pictures. Sew where it’s pinned down.

Repeat on the left side of the pocket.

When the left and right sides of the pocket are sewn to the pant, sew the bottom edge of the pocket. The part of the pocket that’s attached to the pants is hiding behind the original topstitching.

The finished pocket. If you want you can sew the top side ends of the pocket down to keep the top of the pocket flat.

That’s it! Now you have three different kinds of pockets to add to your cargo pants. We’ve got one more coming!
Happy sewing!
Kelly
<– Go back to Pleated Pocket (part two in the series) ** Go on to Pouch Pocket (Last in the series!)
February’s Sewing Challenges
- At February 01, 2013
- By Kelly
- In Challenges
- 0
I can’t believe it’s February already. Of course, it’s freeeeezing here in the Midwest, so hopefully things will go well with the groundhog tomorrow and spring will come early. I’ve never really understood that whole thing – if he sees his shadow, we get more winter, right? But if he sees his shadow, doesn’t that mean the sun is out, so shouldn’t that mean we get spring? Of course, if you were the groundhog and you came up from your cozy hole in the ground to see a whole bunch of people waiting for you, would you stick around? Ack! We’re doomed to winter!!
Did you finish January’s challenges? Yes? Good job! No? Well, it’s a new month, let’s just pick up and carry on. :)
First up, the Monthly Challenge for February 2013:
February – Take time for you!
We’ve made it through the hustle of the holiday season, and the kids are back in school. Sometime before you find yourself knee deep in Valentine’s crafting, (or after you’ve given up on vacuuming up all the glitter!) take the time to make something for yourself. A new top or bag, perhaps? Or a new pair of yoga pants to go with your New Year’s Resolution to get healthier? You deserve it!

Image credit: lululemon athletica
Second, our February Christmas Challenge!
February’s Christmas Challenge:
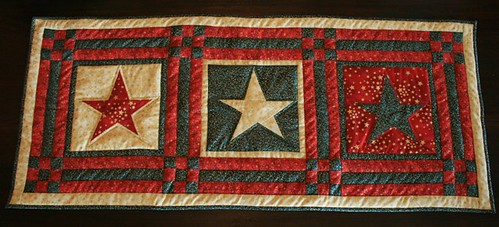
Make a table runner, wall hanging or doll quilt with a Christmas holiday or winter theme.
It just so happens that you can pop over to the forums today and sign up for the winter doll quilt swap that’s happening this month. Sign up to swap a doll quilt or wall hanging so you’ll be committed to getting it done! (Hurry, today’s the last day to sign up!)
Here’s a lovely table runner made by Lily, whose work is found on Flickr at cascade_lily
Happy Sewing!
Kelly
ps – here’s a link if you can’t make it to Punxsutawney, PA to scare the groundhog in person and want to watch him from the comfort of your home.


