Organizing Sewing Supplies – A Trip to the Hardware Store
- At January 15, 2014
- By Kelly
- In Organization
 0
0
Hardware and farm/general supply stores have some great organizing containers. Often the products will look just like the ones available in more specialized shops but with a less specialized price.
For example, you can buy this 26 drawer cabinet at a major craft store for $34.99. I was so surprised by the price that I even double checked the item codes on the price label to make sure it was the correct item for the tag!

Head to the hardware store and you can buy any one of these for $14.99 to $16.99, depending on which style you choose. So you can decide if you want all big drawers, all little drawers or some combination of them.

You might get a 50% off coupon for the craft store, which would make the first one $17.49. But guess what? The $14.99-16.99 ones go on sale for $3 off pretty regularly and you have more choices! So, go to the hardware store for storage supplies and save your 50% off coupon for fabric!
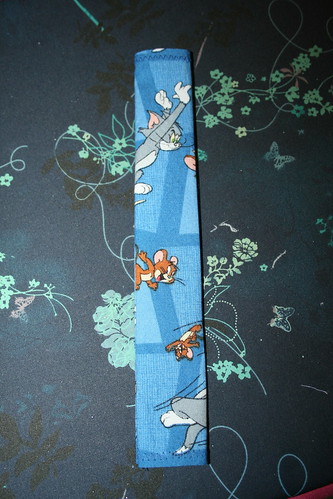
These are great for storing snaps, buttons, extra packs of needles, machine feet, extra rotary cutter blades, and more! Here’s the one I have full of snap parts.
 .
.
Happy Organizing!
Kelly
June Challenges!
- At June 01, 2013
- By Kelly
- In Challenges
- 0
It’s June!
How are you doing with these monthly challenges?
The Monthly Challenge for June 2013:
June – Make it Sew Organized!
Use your sewing skills to organize your space or yourself! There’s plenty of room for creativity in the interpretation of this one. Perhaps you could use a fabric bowl (check the tute!) to hold the keys in your kitchen? Or the assortment of hair ties in your bathroom? Maybe a place to toss the collection of remotes in the family room?

Or maybe you need a bag to collect all your library books?
Perhaps you need a travel bag (check the tute!) to collect all your cosmetics and toiletries before your next trip or just to contain them in your cupboard?

Maybe you need a needle roll to organize your knitting needles? Or a crayon roll to contain the crayons so you don’t find them melting under (or on!) the car seats this summer?
Maybe your sewing space would be a bit more organized with a new pin cushion made to match your room, or made in a favorite color or print that you’ve been hoarding the last scraps of? Whatever your organizational need is, use your sewing skills to get it done!
And, the June Christmas Challenge!
June’s Christmas Challenge:
Seasonal placemats or napkins ~ Make these as simple or complex as you like. Remember those huge holiday prints you thought were so fun at the fabric store and then realized they didn’t really go with anything? They are great for the kids’ placemats or napkins! Perhaps you want the simple elegance of a solid with a tidy rolled hem? If it works for you, it works! Just have fun creating something you will use next winter!
Happy Sewing!
Kelly
Ottobre Sewing Pattern Organization – take 2
- At May 17, 2013
- By Kelly
- In Organization, Patterns
- 3
I’ve warned you about my love of organizing things, right?

I haven’t been sewing much since I went to quilt class, but I did a bit of organizing.
At some point, we were discussing organizing magazines and Bobolots (her forum name) said these were great for magazines. I checked them out and they are great! More on that in a moment. Check these out!
When they first arrive, six of them are stuck together:

So you pull them apart:


Then you take out the middle piece – this is where the magazine pages will slide through.

And then you need to poke out the little holes for the binder rings to go through. You can stack a couple of these together and push them out.

I put mine over a couple of my pattern weights because it’s easy to push through the holes that way and the little plastic pieces don’t go flying all over.

For the children’s issues, I use two binder holders because it just seemed like it needed the extra strength. I’m not sure it was necessary, but I had enough, so I just went with it. :)

You can just slide them over one corner a bit…

And then all the way to the middle of the magazine:

Hopefully you slid it through with the holes on the outside:

And then the holes just go in the binder rings!

Stick them all in binders and you’re set. So pretty….
I highly recommend the seller named rvbookseller listed in the “new from” link, especially if you want to get a whole bunch. That seller also offers them in a pack that contains 120 of them for a very reasonable price. When you buy them individually, the shipping is killer. The seller shipped quickly and answered my questions with lightning speed as well. The link is a Sewing Mamas affiliate link, but I’d recommend the seller even without it. :)
You didn’t notice that my Ottobre changed to three different issues along the way, did you? No, you’re too nice to mention it, thank you! ;)
Happy Organizing!
Kelly
Quick fix for kids’ winter gear!
Here’s a quick and easy way to keep track of your child’s snowpants, because having a name on the label means nothing to a little kid just trying to get on the closest pair of black snowpants as quickly as he can to go outside. You know, the black snowpants that look like every other pair in the school?
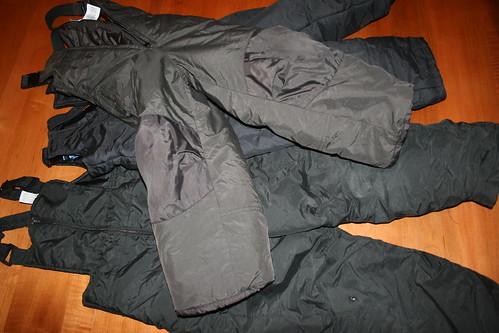
Oh, yeah, those.
Snowpants strap covers!
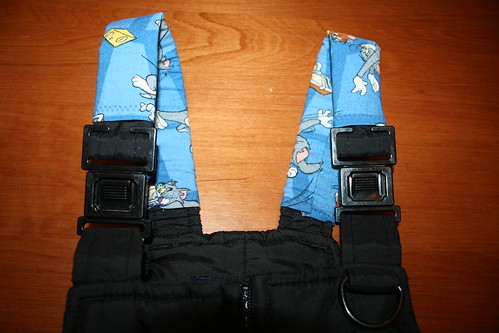
These are super quick and easy if the shoulder strap can come completely off the closure. These can:
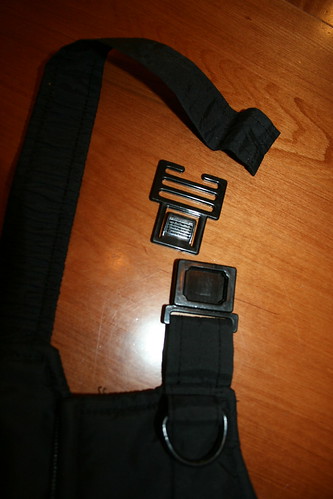
These are sewn to keep the strap attached to the closure,
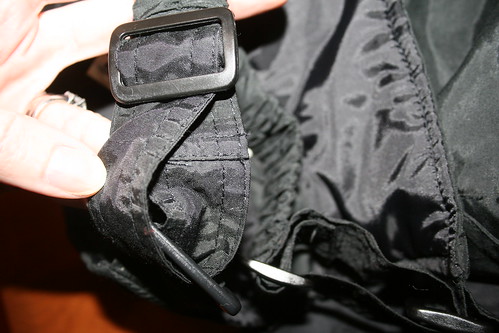
and this is nice for a ton of reasons, but will add extra work for us, see bottom of post at the **.
We’ll talk about the first type first. The pair we’re working with has a strap that’s 1.25″ wide*.
Fun fabrics are great for this –
To make two strap covers you will need:
2 pieces of cotton woven (or quilter’s) fabric, each 3″ wide by 8″. You can make them longer or shorter if you like.
These are sewn with a 1/4″ seam allowance. If you want a wider seam allowance, increase the 3″ width by 2 times your additional amount. (If you want to instead sew with 1/2″ seam allowance, you’re adding 1/4″ more to each sewn side, so cut your pieces 3.5″ x 8″.)
* If your snowpants have a wider strap, simply measure the width, add the seam allowance and double the result.
(width+seam allowance)*2=width of cut fabric
Step 1
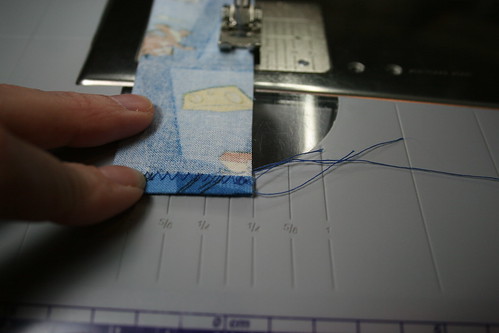
Hem the short sides. Press wrong sides together 1/4″.

Zigzag the hem so it goes just over the cut edge. (You can do this on the wrong side instead of the right side if you like.)
Step 2
Zigzag opposite end.
Step 3
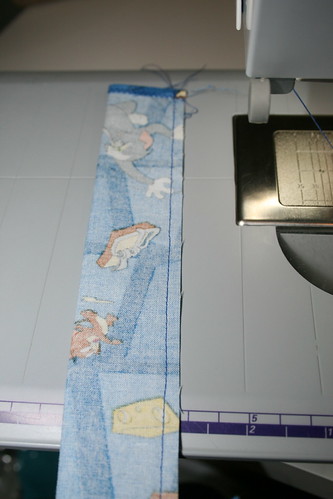
Fold the piece in half the long way, right sides together. I like to press this because then I don’t need to pin it.
Step 4
Stitch together with 1/4″ seam allowance.
How nice!
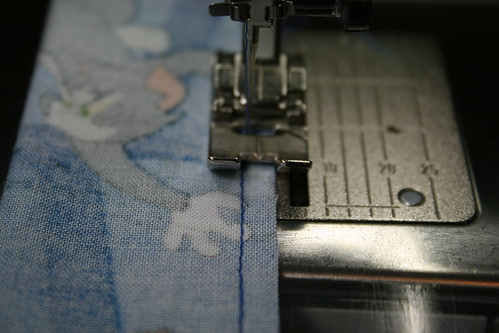
Step 5
Zig zag in the seam allowance to keep it from fraying. I find if I line up my straight stitching so it’s just barely visible where the presser foot sticks up on the left, it stitches in just the right place.
Then you have this:
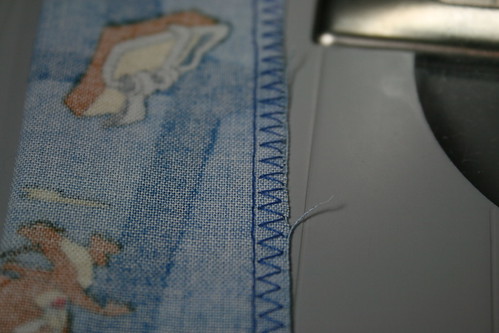
Step 6
Trim threads. Turn it right side out.
Slide your strap into the tube you’ve just made, that’s it!
Bonus Tip!
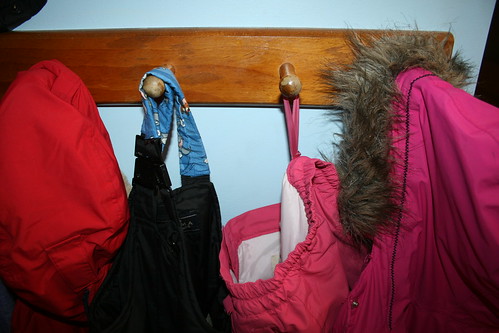
If your child wears the snowpants without the bib overalls, sew a ribbon loop to the inside at the waist so they can be easily hung on a hook. This keeps things tidy and helps them dry faster than when they are left in a pile.
~o~o~o~o~o~o~o~o~o~o~o~o~o~o~o~o~o~o~o~o~o~o~o~o~o~o~o~o~o~o~o~
** If your snowpants have a strap that’s sewn together to keep it from coming off the closure, you have a few options.
Option 1:
Grab your seam ripper and use it to free the strap so you can take it off the closure. When your strap cover is completed and on the snowpants, re-sew the part you seam ripped. (This will make the neatest cover and is also the quickest. Just make sure you’ll be able to sew it back together before you seam rip it! I strongly recommend only removing one strap at a time so you can see how it goes back on.)
Option 2:
Make your strap cover wide enough to go over the closure. To do this, take your measuring tape and measure all the way around the widest part of the closure. Double your seam allowance and add that to your measurement. The result is your fabric width. (This will result in a cover that may be a little slide-y.)
Option 3:
Instead of making a tube, use Velcro-like closures in a manner similar to the way we made our luggage handle covers, skipping the interfacing to avoid its added stiffness. (This will take the longest.)
Happy Sewing!
Kelly
New Needles for the New Year
- At January 05, 2013
- By Kelly
- In Needles and Notions, Organization
- 3
Needles don’t last forever. (Well, except the ones that fall off the Christmas tree. It seems we are still vacuuming up those little buggers in July!)
How long has the needle been in your sewing machine?
Did it come with the machine? Do you just keep using the same one until you run over a pin and it breaks? Or until things just keep going horribly wrong with your stitches and you start swapping out everything – needles, thread, bobbin?
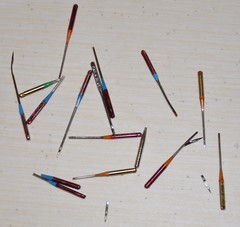 Image: Broken Needles by amboo who?
Your sewing projects will look better and go more smoothly if you use a new needle after 8-12 hours of sewing or every 2-3 projects. And if you hit a pin, button, or other object while sewing, replace that needle right away, even if it looks okay. A damaged or worn out needle leads to damaged fabric and a ruined project. You’re putting a lot of time into your sewing, don’t let the needle foil your efforts.
Why don’t we change needles when we should?
Reason #1: Keeping track of how long a needle has been used is not easy!
Since I use both my sewing machine and my serger for most projects, 2-3 projects doesn’t equate to 8-12 hours use on both machines. This is my current solution:
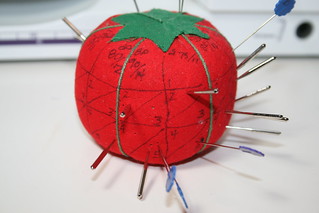
Not pretty, but functional. The tomato is split so each column has five sections. Each time I finish a project or use the needle for about two hours, I put the needle in the next spot. The pins are marked and hold the spot for the needles currently in use. If I finish the project and need the needle for something else in the same machine, I’ll just move the pin to the next spot. The blue pins in the #5 spot for the 90/14 ball point needles are holding the space for the needles currently in my serger. When I’m done with them, I’ll retire that set of needles since this is their fifth use. When they’re done, I put them in an old prescription pill container.
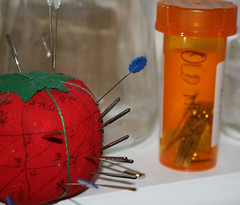
The blue pins each have an “I” written on them in permanent marker because they are placeholders for the needles in my Imagine serger. The sewing machine pin has a “B” on it for Bernina. And so on…

There are a couple things that make this setup work well, besides the ability to keep track of length of use. First, I know which needles are sharps and which are ball points. Second, I don’t have to try to read the itty bitty writing on them to see what size they are. But, it’s not pretty.
Reason #2: Needles are expensive!
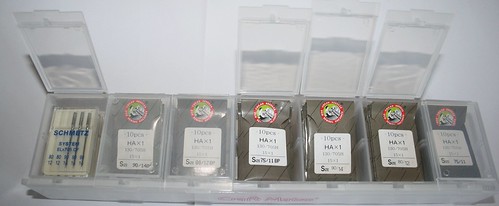
My favorite place to buy needles is CTSUSA.com because their prices are great and they offer free shipping on needles. My sewing machine, a Bernina uses 15×1/HAx1 household machine needles. CTSUSA.com
currently has these for $11.95 for 100 needles in some of the most common sizes. Yep, less than twelve cents a needle. The cost of needles is no longer an excuse not to change them.
But 100 needles? Where do you put them? I happened upon this cute little storage box in the craft section. It was probably intended for beads or something similar, but it’s the perfect size for needle packs. Needle packs are small, if I tossed them in a drawer, they would be all over and I’d be opening a new pack all the time. This keeps them organized.
Do you have a great way to keep track of your needle use? I’d love to see it, especially if it looks nicer than my sharpie tomato!
Happy Sewing!
Kelly
This post contains affiliate links.


