![]() |
|
|||||||
| Tutorials and Group Sew Alongs Did you create a Sew Alongs here? Post them here, as well as tutorials you think would be helpful to other Sewing Mamas that we will change into downloadable patterns eventually. |
![]() |
|
|
Thread Tools | Display Modes |
|
#1
|
||||
|
||||
|
Satin Stitch Applique Tutorial in downloads
Here is how I do the satin stitch applique.
![]() What you will need: -Fabrics of your choice -Heat N Bond lite -pencil -scissors -stabilizer -iron -and sewing machine, of course ![]() 
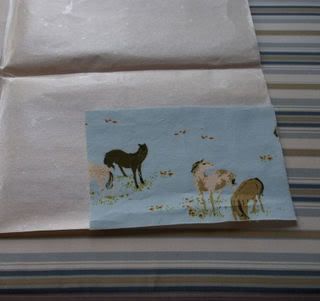
First take the piece of fabric you'd like to make the applique out of and iron the Heat n Bond Lite onto the back. I usually lay my piece out and cut around it, then turn it over and iron it on. ![]() 
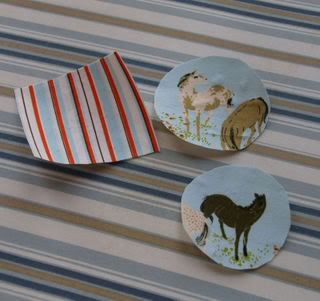
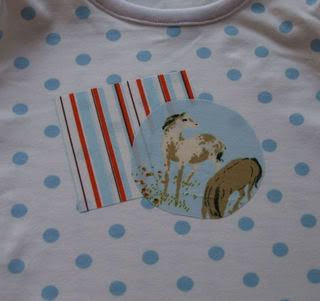
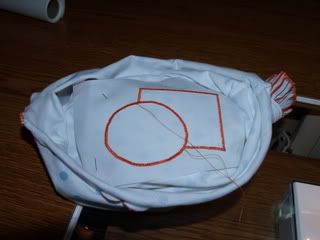
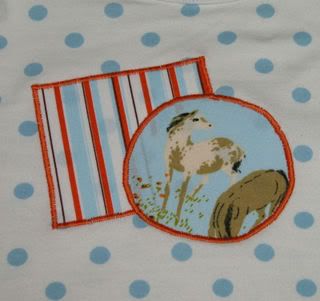
Cut out the shapes you want to applique. In this case I am doing 3 pieces (2 for the front of a shirt and one for the back) Here the pencil comes in handy to draw an exact shape on the paper backing, and you can also trace something on the paper part before ironing it to the fabric too...just remember the shape will be reversed when you put it on your item. ![]() Tip: don't cut out the exact shapes until after you iron on the Heat N Bond Lite, it makes it so much easier to cut it out afterwards and not have to line up exact shapes. 
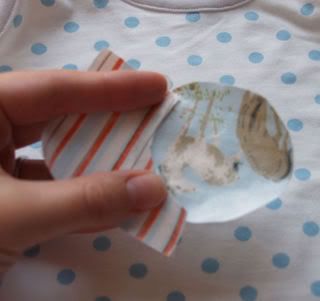
Peel off the paper backing and position it to where you like it. Then iron them on. ![]() Tip: When you have one overlapping the other, sometimes it's good to cut away the excess so that only the edge overlaps. This is great for when you use lighter fabrics and can see through them and also keeps it so it's not so bulky. ![]() 
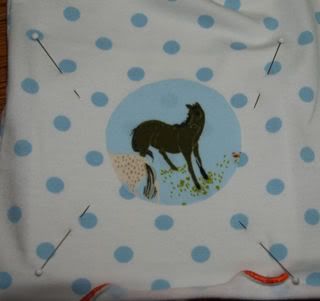
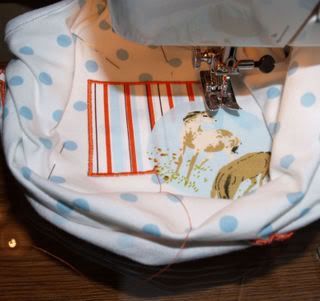
Next I cut a piece of stabilizer and place it under all of the fabrics (I use a tearaway kind) Pin around the edges to hold it in place. ![]() 
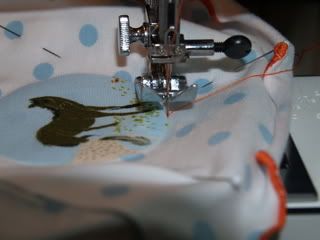
Now it's time to sew! 
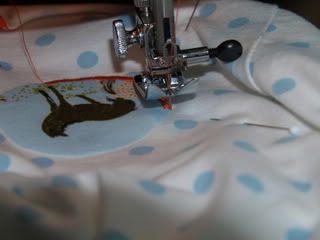
The satin stitch is just the zigzag stitch. You can make it as wide and as long a stitch as you like. (for these I used a stitch width of 2.5 and length of almost 0, I like mine tight together) I know all machines are not the same so play on a scrap and see what you like. I start on the outside edge and put my needle right next to the edge of the applique. ![]() When I stitch on a curve, I go a couple of stitches and, with my needle in the fabric, I lift my presser foot and slightly turn the fabric, then repeat. Tip:for an outside cuve (like I'm doing) stop your needle on the outside when turning...for an inside curve, stop your needle on the inside. ![]() 
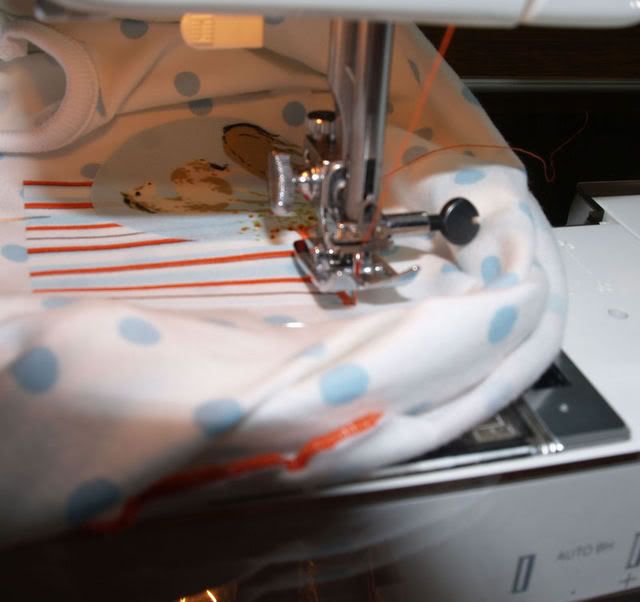
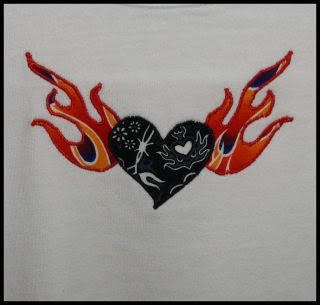
Tip: for straight square type stitches-when you get to a corner you want to go a couple of stitches past the edge and then turn. (sorry the pic is kinda hard to see) ![]() Tip:when working with more than one piece, I always start stitching the one that is underneath if possible. That makes it so the edges get covered by the last one you stitch. ![]() And last I take the pins out and tear away the paper stabilizer.
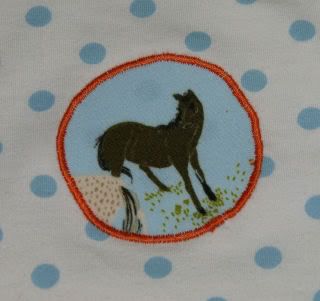
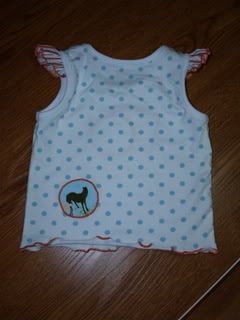
 ![]() All done! ![]()
__________________
Krista~ Mommy to Kyra 7-31-05 & Logan 12-30-08 To view links or images in signatures your post count must be 0 or greater. You currently have 0 posts. |
|
#3
|
||||
|
||||
|
Very timely! I was just asking about appliques in a thread yesterday. I will have my laptop with your tutorial right by my sewing machine while I attempt my first one tomorrow. Thanks so much for taking the time to share this! Very clear photos and instructions.
__________________
Heather Mama to: To view links or images in signatures your post count must be 0 or greater. You currently have 0 posts. Chase(7)Regan(5)Maso n(3)Eli(1) Married to my dh To view links or images in signatures your post count must be 0 or greater. You currently have 0 posts. (who can fix ANYTHING!) for 9 years |
|
#4
|
|||
|
|||
|
Wonderful tutorial mama. I love to see these and you did a FABULOUS job!!!!!!!!!!
Now I feel the need to applique, lol.
__________________
Amy SAHM mom to 5 .Wife to one computer genius who thinks I have no brain. To view links or images in signatures your post count must be 0 or greater. You currently have 0 posts. To view links or images in signatures your post count must be 0 or greater. You currently have 0 posts. |
|
#5
|
||||
|
||||
|
Thank you.
I am a detail oreinted. And you are very specific. Thank you again!
__________________
Shaima "Maya" as DS calls me to him M 12/26/05, and to my girl A 7/27/07,and baby boy M 6/14/09 ISO: Olive+S Bubble Dress size 2T & up Mamu Imke, Mamu Nike, Mamu Ulla Minkee dot: Yellow or Baby Blue Velour (75-80% cotton):In chocolate, raspberry, black, orange, red at good price to help on the international shipping please ^_^ |
|
#8
|
||||
|
||||
|
Awesome tutorial. Thanks so much for sharing!
__________________
Mama's Boys: Skinny Noah (Aug 03), Fat Owen (Jun 06), and someone new coming in January Searching for Balance? To view links or images in signatures your post count must be 0 or greater. You currently have 0 posts. |
|
#9
|
||||
|
||||
|
Thanks Krista--that tutorial is awesome!
__________________
~*~Lauren & Kathryn First Day of School 2008~*~ To view links or images in signatures your post count must be 0 or greater. You currently have 0 posts. To view links or images in signatures your post count must be 0 or greater. You currently have 0 posts. To view links or images in signatures your post count must be 0 or greater. You currently have 0 posts. To view links or images in signatures your post count must be 0 or greater. You currently have 0 posts. To view links or images in signatures your post count must be 0 or greater. You currently have 0 posts. |
|
#10
|
||||
|
||||
|
Thank you so much for posting this! I attempted several appliques this past week and they look "okay", but now I see I did several things wrong.
I love that letter A -- so pretty. Also, I thought that the Heat and Bond says to NOT use w/a sewing machine? Can you use a machine? I was afraid to try. Tanya |
|
#11
|
||||
|
||||
|
Thank you for the tutorial.
These are great instructions. Very easy to understand!
__________________
To view links or images in signatures your post count must be 0 or greater. You currently have 0 posts. Lisa wife to Simon and mom to 7 wonderful kids! McKrae 13, Westley 11, Grant 9, Leah 7, Elise 5, & Ella 3 and Leeanne born 2/09 |
|
#12
|
|||
|
|||
|
Thanks for sharing the tutorial! It helps a lotta lotta lotta lot!!!
__________________
*~Kim~* To view links or images in signatures your post count must be 0 or greater. You currently have 0 posts. Missing my furry boy Krusty! 1990-2009 To view links or images in signatures your post count must be 0 or greater. You currently have 0 posts. To view links or images in signatures your post count must be 0 or greater. You currently have 0 posts. ISO: Stampin Up stamps and accessories
|
|
#14
|
||||
|
||||
|
2 thumbs way up for an awesome tutorial.
__________________
Sabrina Mom to 3 little men and a little lady To view links or images in signatures your post count must be 0 or greater. You currently have 0 posts. I blog! To view links or images in signatures your post count must be 0 or greater. You currently have 0 posts. To view links or images in signatures your post count must be 0 or greater. You currently have 0 posts. ISO of Ottobre 2/01 |
|
#15
|
||||
|
||||
|
Quote:
)
|
|
#17
|
||||
|
||||
|
Krista..
the only thing that would improve this tut is if you told me how to make one of those adorable fairy appliques!!
__________________
Sheri: college student To view links or images in signatures your post count must be 0 or greater. You currently have 0 posts. sewing noob To view links or images in signatures your post count must be 0 or greater. You currently have 0 posts. and single mama To view links or images in signatures your post count must be 0 or greater. You currently have 0 posts. to 2 yr old LillyGoose To view links or images in signatures your post count must be 0 or greater. You currently have 0 posts. To view links or images in signatures your post count must be 0 or greater. You currently have 0 posts. To view links or images in signatures your post count must be 0 or greater. You currently have 0 posts. To view links or images in signatures your post count must be 0 or greater. You currently have 0 posts. |
|
#18
|
||||
|
||||
|
Great info, thanks!
Question--so when you wash it, do the stitches ripple or anything? Because I've done this a couple times and after laundering, it gets a little... less pretty (I mean appliques on knits primarily, with wovens I don't have this problem). The first time I think I didn't use stabilizer, and it was pretty bad. And I've done it with tearaway stabilizer and still had rippling after laundering the item. I guess I'm wondering if this is common or if there's something I'm missing. I do want to try appliqueing with a stabilizer that is left on and see if that helps....
__________________
Vicki blog: To view links or images in signatures your post count must be 0 or greater. You currently have 0 posts. etsy: To view links or images in signatures your post count must be 0 or greater. You currently have 0 posts. To view links or images in signatures your post count must be 0 or greater. You currently have 0 posts. |
|
#19
|
||||
|
||||
|
Quote:
Although I just started using the mesh fusible stuff (don't know it's exact name) after I'm all done. I got it a Joann's and it looks like the same stuff you see on the back of applique's on RTW clothing. |
|
#20
|
||||
|
||||
|
Unfortunatly I cannot get HeatnBond Lite.
But I got a question, So the main purpose in applique, is to interface the applique and fuse it temporary to the garment (until washed) or fuse everthing permenantly, interfaced applique permenantly fused to garment? TIA! |
![]() |
| Bookmarks |
| Thread Tools | |
| Display Modes | |
|
|
| Please consider supporting Sewing Mamas LLC by
clicking on these links while shopping |