User Tag List

Results 1 to 14 of 14

Thread: Kaleidoscope skirt Tutorial * added to downloads *

  1. #1
    Join Date
    Jan 2007
    Location
    Northern Canada
    Posts
    2,992
    Downloads
    47
    Uploads
    0

    Kaleidoscope skirt Tutorial * added to downloads *


    This is my first tutorial, so hope this all makes sense!

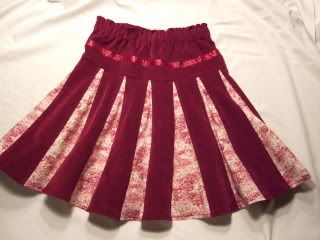
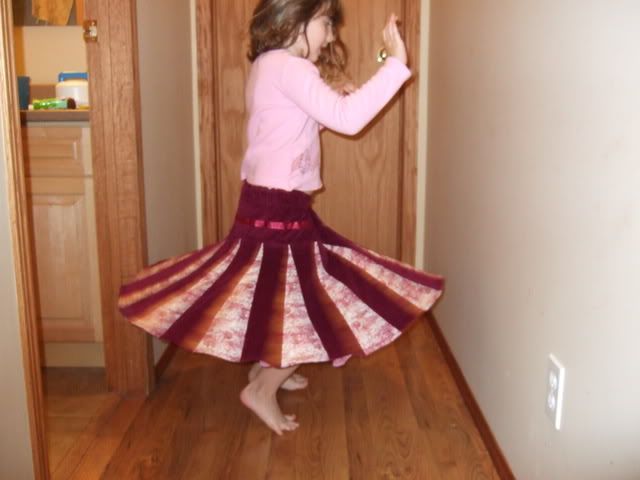
    This skirt is a cross between a strip skirt and a circle skirt. I will try to explain how we came up with the measurements, so that you can adjust the size accordingly. The example here is for a size 7 skirt (what my dd is currently wearing). If you like this tutorial and make your own skirt, please donate $5 to the charity of your choice (Just a thought, why don't you donate to sewingmamas?? :-) )

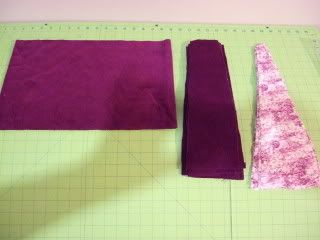
    What you will need (for size 7):
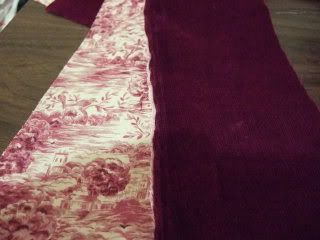
    1 y heavier fabric (eg. Softer Cord used here) Refered to herein as fabric #1
    1 y lighter cotton fabric (also think a lighter guaze material would be nice). Refered to herein as fabric #2.
    If you want an underskirt or lining: 1 to 1.5 y of choice fabric
    Elastic for waist (1” used here)
    Ribbon detail (if desired)
    Thread

    Making your pattern:

    This is the hard part. But basically measure waist size and base your measurements on 1.3 times waist measurement.

    We had a waist (actually hip size as dd likes to wear things on her hips, not waist) size of 25”. Thus our measurements were based on a 32” strip.

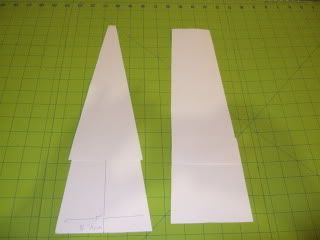
    FABRIC #1: These strips are rhomboids. To make your strips, divide this by the number of strips you want of fabric #1. We used 13 strips. Thus the width of the top of each strip was 2.5”. Adding ¼ inch on either side gave us 3 inches at the top of the strip. We added 1.5” to give us the width of the bottom strip. So, each strip of fabric #1 was 3 inches on the top and 4.5 inches on the bottom. Measure for your length (we used 14.5” ). We drew this all out on cardboard to make our template, then cut 13 pcs of fabric.

    FABRIC #2: These strips are triangular. Since fabric #1 was to be side-by-side at the top, we only allowed for ½ inch at the top (¼ inch seam allowance on both sides). To complete a circle on the bottom, we used 5 inches on the bottom. Then we connected the top and bottom marks to make our triangle. We made our template out of cardboard, and cut 13 pcs of fabric.


    I am really not sure how we came up with the bottom measurements. DH calculated this out to make 360 degrees. But in hind sight, and easier way to do this would be to cut out a circle to the length you need and run a tape measure all the way around the edge and divide by 26 (13 + 13). You will need the circle anyways to make your underskirt or lining. There are lots of tutorials on circle skirt calculations, we had a pre-existing pattern that we used.

    Tricia: wife to wonderful DH and mother to 2 princesses.


    To view links or images in signatures your post count must be 0 or greater. You currently have 0 posts.

  2. #2
    Join Date
    Jan 2007
    Location
    Northern Canada
    Posts
    2,992
    Downloads
    47
    Uploads
    0
    We didn’t have enough material for an underskirt, but I thought it would be super cute to add this on. Basically a circle skirt that is longer than your top skirt. I figured for us, 2.5 to 3 inches longer than the top skirt would have looked nice. Going to try this next time. (BTW, our template pcs above were lengthened to compensate for lack of underskirt. We lengthened it. It is all ready to go for us to try next time with an underskirt. Just wanted to explain that incase you were wondering why there seemed to be 2 sections of our template above.)

    Your waistband would just be a rectangle cut of fabric #1. Our measurements were 9 inches (allowing 2 inches for casing and ½ inch seam allowance on bottom) by 32 inches (1.3 times the waist measurement as described above).

    If you have gotten this far, you are well on your way!! Confused?? PM me and I will try to help you out.

    Putting it all together:

    We did French seams Then we ironed the lighter fabric (#2) toward the heavier fabric (#1) and double needle topstitched it down. Topstitching was always done on fabric #1. This way the lighter fabric will fall in slightly behind the heavier fabric to almost look like a peak through lininig/underskirt. We did this for ALL the strips alternating the 2 fabrics.


    Once all the strips were joined, we had our circle skirt part. It was hemmed. We hemmed our circle skirt lining and basted it to the top skirt at the top.

    We sewed a ribbon detail onto our waistband rectangle. The we folded our rectangle in ½ with right sides together and made the back seam ¼ inch, making sure to line up the ribbon.
    We made the casing for our elastic by folding over at the top ½ inch then again 1”. Basically, this is just a really wide waistband to sit just below the butt cheeks. Standard casing. Nothing too fancy, really. Not sure if a Kori waistband would work here? Something to think about.

    We pinned our waistband to our circle skirt (top skirt basted to underskirt) and used ½ inch seam allowance here. Finish the seam via your choice (serger, overstitching, or tight zigzag). We topstitched the seam to the upper portion of the waistband with a double needle.

    Ta da! You are done. Putting it all together is basically like doing a strip skirt.


    Hope this all makes sense. I took more pictures, but some of them were lost in uploading. If you have any questions, I would be happy to try to answer them.
    Tricia: wife to wonderful DH and mother to 2 princesses.


    To view links or images in signatures your post count must be 0 or greater. You currently have 0 posts.

  3. #3
    Join Date
    Jan 2007
    Location
    Northern Canada
    Posts
    2,992
    Downloads
    47
    Uploads
    0
    I am trying to edit this to make it better...but have to go get the girls ready for bed. Back later to work on it. In meantime, if there is anything I should add or if something doesn't make sense...just reply here. Thanks for looking!!
    Tricia: wife to wonderful DH and mother to 2 princesses.


    To view links or images in signatures your post count must be 0 or greater. You currently have 0 posts.

  4. #4
    Join Date
    Jan 2007
    Location
    Atlanta
    Posts
    2,530
    Downloads
    7
    Uploads
    0
    Thanks for the great tutorial! That skirt looks beautiful!
    Wife to Matt; Mom to Joshua (19), Garrett (17) and Liesl (5)

    [SIGPIC][/SIGPIC]
    To view links or images in signatures your post count must be 0 or greater. You currently have 0 posts.


    My blog:
    To view links or images in signatures your post count must be 0 or greater. You currently have 0 posts.

    My Etsy:
    To view links or images in signatures your post count must be 0 or greater. You currently have 0 posts.

  5. #5
    Join Date
    Jul 2005
    Location
    Somewhere!
    Posts
    16,512
    Downloads
    21
    Uploads
    0
    LOVE The skirt. Trying to comprehend the tutorial (But I'm really tired).


    Isabel

  6. #6
    Join Date
    Sep 2007
    Location
    Alabama
    Posts
    95
    Downloads
    0
    Uploads
    0

    Darling skirt

    The skirt is so pretty. theclap

  7. #7
    Join Date
    Jul 2007
    Location
    North Carolina
    Posts
    675
    Downloads
    54
    Uploads
    0
    Oh awesome, I'm going to try this soon!
    Janice
    Mom to Haley and Harper

    To view links or images in signatures your post count must be 0 or greater. You currently have 0 posts.

  8. #8
    Join Date
    Jan 2007
    Location
    Northern Canada
    Posts
    2,992
    Downloads
    47
    Uploads
    0
    Quote Originally Posted by Isabel View Post
    LOVE The skirt. Trying to comprehend the tutorial (But I'm really tired).
    It seems confusing on paper, but once you get into it, it will hopefully make sense. If you really need to, you could always trace out a circle skirt and do your triangles and rhomboids right on that. It really helped to have DH work on the measurements with me.
    Tricia: wife to wonderful DH and mother to 2 princesses.


    To view links or images in signatures your post count must be 0 or greater. You currently have 0 posts.

  9. #9
    Join Date
    Jun 2006
    Location
    Atlantic Canada
    Posts
    6,538
    Downloads
    79
    Uploads
    0
    great job! that is really clear andi'm going to try it. love the spin on that skirt!
    is this going in the downloads?
    Misty
    Mama to Savana Banana(9) an Benny Bean (5)


    To view links or images in signatures your post count must be 0 or greater. You currently have 0 posts.

    To view links or images in signatures your post count must be 0 or greater. You currently have 0 posts.

  10. #10
    Join Date
    Jan 2007
    Location
    Northern Canada
    Posts
    2,992
    Downloads
    47
    Uploads
    0
    Quote Originally Posted by Misty589 View Post
    great job! that is really clear andi'm going to try it. love the spin on that skirt!
    is this going in the downloads?
    I don't know how to do that, or even if I am allow to. But the mods can do this if they feel it is the right thing to do!
    Tricia: wife to wonderful DH and mother to 2 princesses.


    To view links or images in signatures your post count must be 0 or greater. You currently have 0 posts.

  11. #11
    Join Date
    Aug 2007
    Location
    Texas
    Posts
    1,123
    Downloads
    28
    Uploads
    0
    That is a very pretty skirt! I love the way it twirls.

    To view links or images in signatures your post count must be 0 or greater. You currently have 0 posts.

    Rachel,
    To view links or images in signatures your post count must be 0 or greater. You currently have 0 posts.
    wife to dh, mama to Jovi 9/05, Corbin 1/08 and Nate 9/12

  12. #12
    Join Date
    Jun 2006
    Location
    Atlantic Canada
    Posts
    6,538
    Downloads
    79
    Uploads
    0
    has this been added to the tutorials? I can't find it there............jus t wondering
    Misty
    Mama to Savana Banana(9) an Benny Bean (5)


    To view links or images in signatures your post count must be 0 or greater. You currently have 0 posts.

    To view links or images in signatures your post count must be 0 or greater. You currently have 0 posts.

  13. #13
    Join Date
    Aug 2006
    Location
    Winder, Georgia
    Posts
    1,476
    Downloads
    44
    Uploads
    0
    Thanks! I am going to give it a go next week!

    To view links or images in signatures your post count must be 0 or greater. You currently have 0 posts.

    Check out our
    To view links or images in signatures your post count must be 0 or greater. You currently have 0 posts.
    , it is documenting our journeys into homeschooling and a crunchier life!

    To view links or images in signatures your post count must be 0 or greater. You currently have 0 posts.

    To view links or images in signatures your post count must be 0 or greater. You currently have 0 posts.

    I accept RME!!!!!

  14. #14
    Join Date
    Apr 2009
    Location
    Selling Off My Stash!
    Posts
    5,190
    Downloads
    73
    Uploads
    0

    Re: Kaleidoscope skirt Tutorial

    Love the look- Can't wait to try it!
    Nicole
    SAHM of
    To view links or images in signatures your post count must be 0 or greater. You currently have 0 posts.
    DD (8) and
    To view links or images in signatures your post count must be 0 or greater. You currently have 0 posts.
    DS (5)


    ISO Anything? Still have lots of knits let to sell just ask me
    To view links or images in signatures your post count must be 0 or greater. You currently have 0 posts.

Posting Permissions

  • You may not post new threads
  • You may not post replies
  • You may not post attachments
  • You may not edit your posts
  •