


OK, so here goes - bear with me, I had no photos for this one so I've gone with a diagram! Hope you can make sense of it!
See, I knew you'd get it......rofl!
Ok, so the amount of fabric you need will depend on the size of top you're making, obviously - so I won't tell you how much you need! For mine, I used a yard of main fabric, and then 5 charm pack squares. You'll also need some elastic - I used 1/4" (6mm).
Firstly, decide on how long you want your top to be, and measure it. How high up the chest you'd like it to come, and where would you like the bottom to sit - on your waist? Hips? I wouldn't recommend tunic length, unless to omit the elastic from the bottom - it might look a little odd!
Next, you need to work out how many charm squares you will need, and sew them into a long strip. Alternatively, you can just use a long strip of co-ordinating fabric.
Then you need to decide how wide the top of the top will be - then halve that measurement (as your fabric is folded) and add half THAT again. Clear? (So say your top will be 20cm - halve that to 10, then add 5. ) That's your top measurement.
Then do the same for the bottom...only this time, measure all the way round your waist/hip, halve it, halve it again, then add half that. That will give you your (B) measurement.
Next, from an existing top you have, mark arm holes (but remember the top of your top doesn't come all the way up to the shoulder, so mark only from where your top will sit!).
From the bottom corner of your arm hole, draw a straight line down to the bottom corner of your bottom line. Your 'pattern' should now look like the main outline on my picture above. It does? Amazing!
OK, now the hard part is out of the way - cut it out, (with whatever seam allowance takes your fancy, remembering to leave enough top and bottom for elastic threading!) but leave it folded.
Now to cut your back piece - exactly the same size as your front piece, but only as long as the bottom of your armhole (C). Cut out with seam allowances as before.
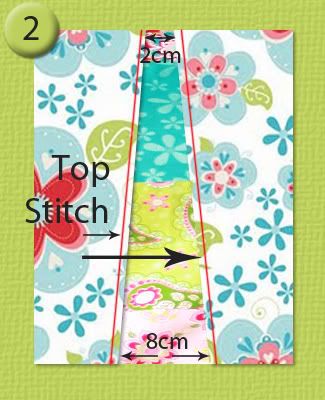
Now, back to the front piece. On the fold, mark in 1cm at the top, and 4cm at the bottom. Draw a line between the two points, and cut. (D) This will be your graduated front panel.
Take your charm squares (sewn into a strip) or fabric strip, lay it out flat, and add your two front pieces - 2cm apart at the top, and 8cm apart at the bottom. I did mine by folding over a small edge on the front piece and pressing, then folding again, laying on and top stitching.
Still with me so far? You're doing great!
So now you should have one front piece, and one back piece. You HAVE? You rock, you know that?
Now we need to sew the channels for the elastic on the tops of each piece. The size is up to you, but will obviously depend on the size of your elastic! Once you've done that, I used the technical method to measure my elastic - holding it up against myself and saying 'Yep, that's about right!' lol!
Then thread your elastic on the top of the front piece and back piece, pin in place, and sew front and back together down the side seams.
Now for the bias binding and straps.....and I have a confession to make. My straps aren't cut on the bias *SHOCK*. The armhole binding were, however...there's no way straight cut would go round those corners! If I'd had enough left over fabric, the straps would have been too. But I didn't. If you decide to use all bias tape, then you can do these in one continuous strip from armhole to strap, whereas I did mine separately. If you don't know how to make your own binding, here's a fantastic 'Make your own bias binding' tutorial!
Once you have made your binding, straps, etc, decided how long they need to be to go round your neck (I'm assuming here you're not a giraffe - I've never seen a giraffe with a sewing machine), then you need to sew them on - you can find more about this in the tutorial mentioned above.
Wow, is it looking like something you could actually wear yet? I do hope so....although if you follow my ramblings, then it may be not so much lol! Now we just need to finish...
...the bottom! Now, if you're leaving it loose with just a hem, then hem it and you're done, so go for it!
If, however, you want it like me with an elasticated bottom (my top, not MY actual bottom!) then you need to sew a channel for the elastic round the bottom, remembering to leave a gap to actually put the elastic in (unlike me, who had to unpick some!)
Then thread your elastic, sew in place, and finish up the gap in the hem!
Woohoo! You're finished! Well done you! (Especially if you managed to follow these instructions without the need of psychiatric help lol!)


 Reply With Quote


Bookmarks