User Tag List

Results 1 to 14 of 14

Thread: 60-year-old (at least) Bias Cutting Tutorial - DL

  1. #1
    Join Date
    Aug 2007
    Location
    Northwest
    Posts
    4,164
    Downloads
    4
    Uploads
    0

    Scissors 60-year-old (at least) Bias Cutting Tutorial - DL


    60-year-old (and counting)
    Bias Cutting Tutorial
    with one extra, albeit important, step....
    {Courtesy of April 1930's.}

    This bias cutting technique has actually been around for quite some time. It wouldn't surprise me if it was something Mary Brooks Picken discovered all on her own when she assisted with the writing and publication of the old Singer Sewing Book. It's a simple trick, really, and makes use of small pieces for fabric conservation!

    Sometimes I have a little piece of fabric leftover from a project, but not enough to cut long strips for bias trim - and it would be tedious to sew several small strips together. Other times I want to conserve every last fiber of yardage because of the fabric rarity or cost. I have a feeling I will be using this technique often for my Liberty remnant prints!


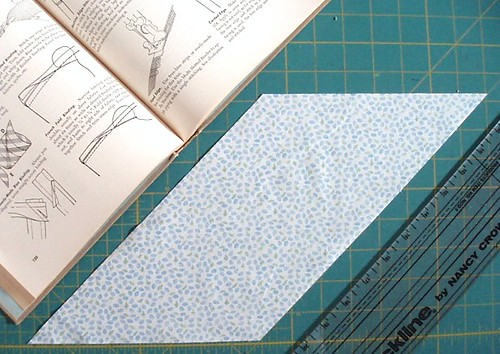
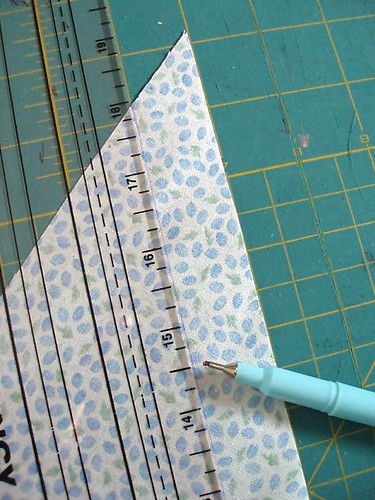
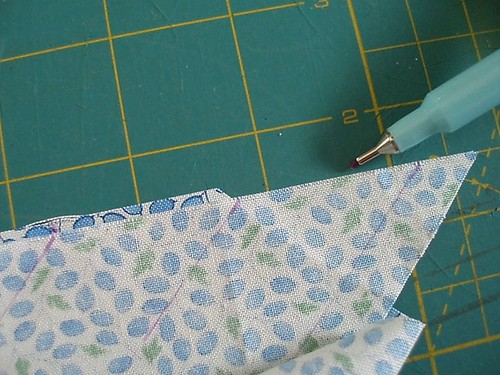
    To begin, cut a parallelogram shape from fabric with the long sides being cut on the bias and the short sides being cut on the straight of grain.


    Long sides are cut on the bias and short sides are cut on the straight of grain (as indicated by the grid on the cutting mat)


    Accuracy is very, very important, and can make a difference in the end result, so be sure to cut the straight-grain sides and bias sides very straight like you see in the photograph above.


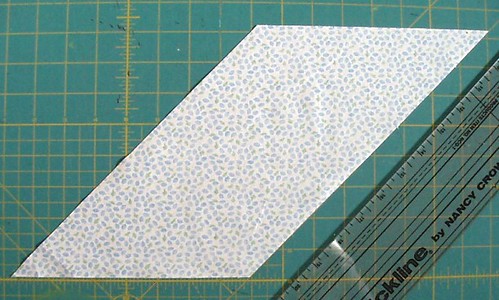
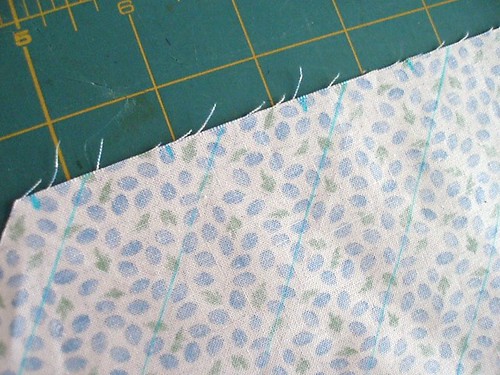
    Turn your fabric piece so that the bias edge is aligned to a straight line on the cutting mat grid and the straight-grain edge is aligned to the bias cutting line on the grid. This will allow you to draw parallel lines spaced evenly (following the straight lines on the grid) for perfectly straight bias strips... (see next photo for clarification)


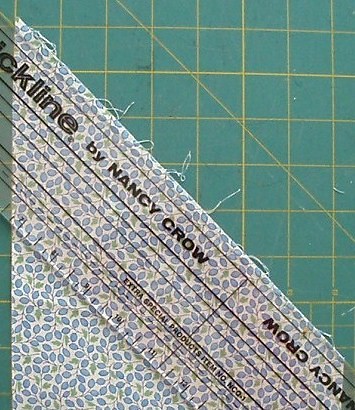
    Now you can draw your bias lines using the measurements on your cutting mat. Whether you want bias that measures 1 inch, 1.5 inches, etc.... with a fabric marking pen, you can use the straight lines on the grid as your guide to mark parallel bias-cutting lines. (see next photo for illustration)


    On the back side of the fabric piece measure and mark your bias strips to your desired width. It does not matter what width you prefer, this technique is applicable for any bias width desired.
    This illustration is showing 1-inch bias being evenly lined with a fabric marking pen following the 1-inch grid lines on the cutting mat.


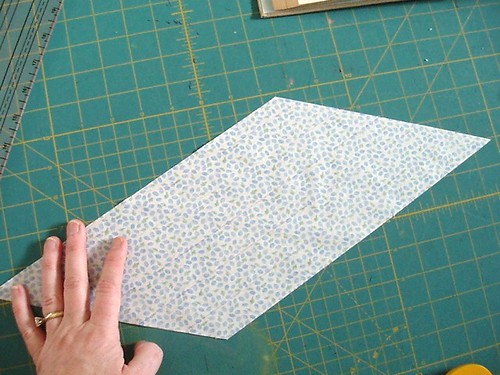
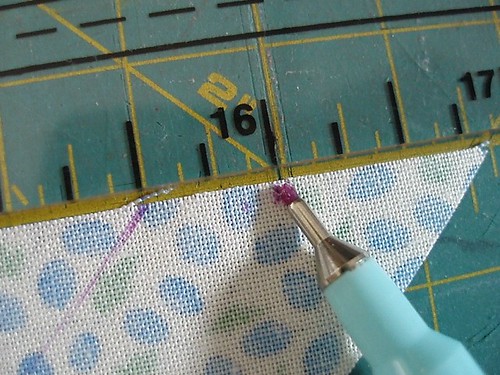
    Taking the Singer Sewing Book technique one step further, on one *straight-edge side*, make a mark 1/2-inch on either the right or the left side (it doesn't matter which) of EACH bias line.


    In the photo above, I made my marks 1/2-inch to the left of each bias line.


    After you make your 1/2-inch marks, transfer them to the right side of the fabric so you can easily see them when you align right sides together in the next step.


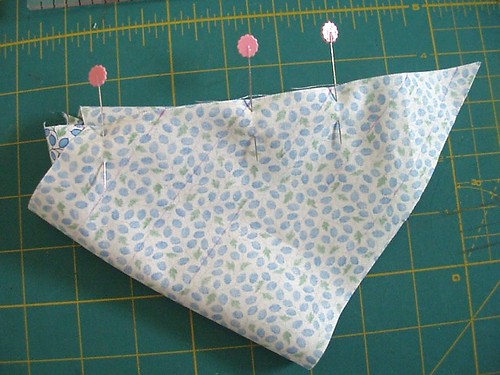
    Begin matching right sides together with the two straight-edge sides. Make sure that you have one full bias width (as indicated by the pen) that will NOT get stitched... simultaneously aligning the bias lines on one straight edge side to the 1/2-inch marks you made on the other straight edge side as you will see in the next photograph.


    Precisely pinning the two straight-edge sides together, align the bias lines of one straight-edge side to the 1/2-inch marks you made on the other straight-edge side. This will ensure that after stitching the two sides together, your bias lines will align straight and continuous despite the seam allowances.


    When you bring the straight-edge sides together it will seem a bit awkward, but that is normal.

    NOTE: You will need to have one full width of bias (which will NOT get stitched) on at least one end when you pin it together as indicated by the previous two pictures in the tutorial.


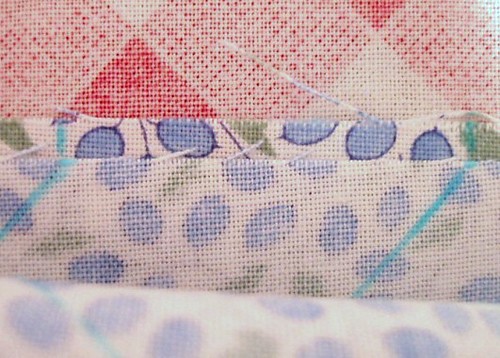
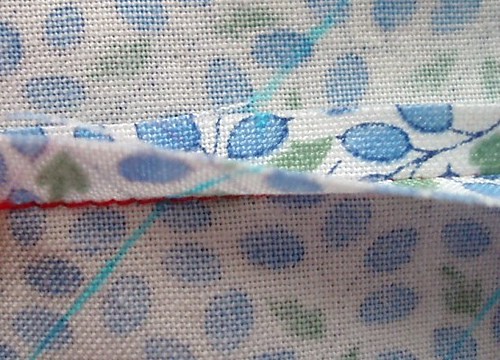
    Stitch the two straight ends together using a 1/4-inch seam. Again, being precise is very important.

    Notice the red stitching in the photo above? I stopped just short of the last full width of bias. There is now a full bias width that was NOT stitched as indicated in previous photo illustrations. (the extra little width on the right side is just excess and will get cut off)


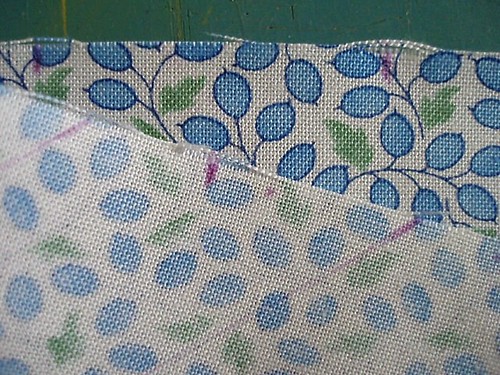
    When you align the bias lines on one side to the 1/2-inch marks you made on the other side, after stitching the right sides together, your bias lines should run in a continuous line - even through the seam you just stitched.


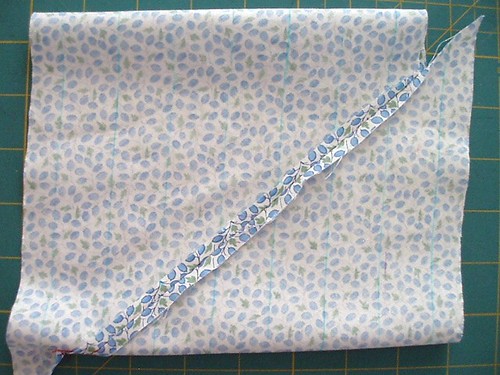
    You can see here how the bias lines are now perfectly aligned running continuous through the seam - essentially forming a fabric tube.

    Using a pressing ham or rolled towel, insert it into your fabric tube and press the seam allowances open.


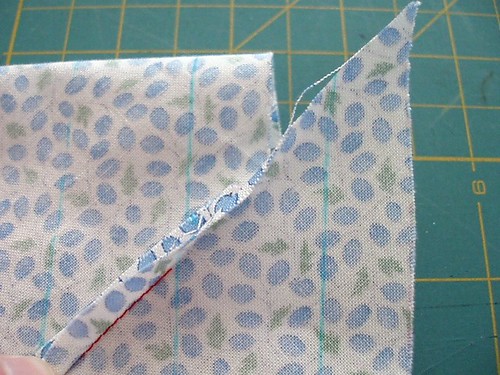
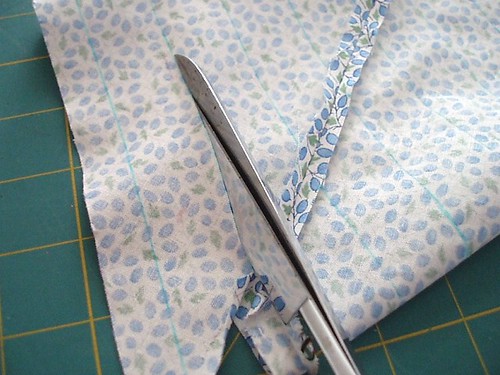
    Beginning with the side edge that has your un-stitched full-bias width, begin cutting following the bias lines you marked.


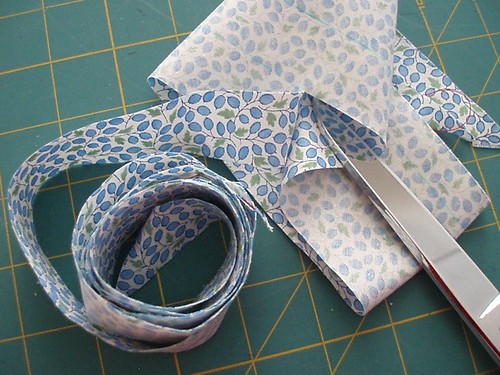
    You should just keep cutting with the lines essentially forming one continuous path. Trim any excess.

    My initial 8 x 18 inch fabric piece yielded 82 inches of one-inch bias!

    Bias Cutting Tutorial courtesy of April 1930's.
    Your Stitchery Friend,
    April


    To view links or images in signatures your post count must be 0 or greater. You currently have 0 posts.

  2. #2
    Join Date
    Feb 2009
    Location
    Oregon
    Posts
    16,980
    Downloads
    71
    Uploads
    2

    Re: 60-year-old (at least) Bias Cutting Tutorial

    Amazing!
    Tera
    To view links or images in signatures your post count must be 0 or greater. You currently have 0 posts.
    Mom to Madelyn, Harley, Emily and Samuel!

  3. #3
    Join Date
    Jan 2009
    Location
    Rochester, NY
    Posts
    8,250
    Downloads
    36
    Uploads
    2

    Re: 60-year-old (at least) Bias Cutting Tutorial

    That is mind-blowing. Wow.
    Jenn
    ~ full time working mom to a 7 yo dd, 9 yo ds, 11 yo ds, and 12 yo dd -- with a homeschooling dh!

    I (used to) blog at
    To view links or images in signatures your post count must be 0 or greater. You currently have 0 posts.


    To view links or images in signatures your post count must be 0 or greater. You currently have 0 posts.

    To view links or images in signatures your post count must be 0 or greater. You currently have 0 posts.
    by
    To view links or images in signatures your post count must be 0 or greater. You currently have 0 posts.
    , on Flickr

  4. #4
    Join Date
    Jul 2007
    Location
    The Bronx
    Posts
    7,722
    Downloads
    140
    Uploads
    0

    Re: 60-year-old (at least) Bias Cutting Tutorial

    oh my goodness that is amazing. I'm a little dizzy but it was great. thanks April!!
    [SIGPIC]
    To view links or images in signatures your post count must be 0 or greater. You currently have 0 posts.
    [/SIGPIC]
    I live for that face.

  5. #5
    Join Date
    Mar 2007
    Location
    Beautiful Pacific NW
    Posts
    4,434
    Downloads
    95
    Uploads
    1

    Re: 60-year-old (at least) Bias Cutting Tutorial

    Fantabulous!! Thanks so much for sharing this. I normally just cut individual bias strips, and then sew them together, but this is sooo much better, and easier.
    Leslie, wife to Josh
    To view links or images in signatures your post count must be 0 or greater. You currently have 0 posts.
    and homeschooling mommy to Cortney-15, Ryley-14, Jacob-12 & Jordan-11


    To view links or images in signatures your post count must be 0 or greater. You currently have 0 posts.

    Photo by Cortney

    "To educate a man in mind and not in morals is to educate a menace to society." ~~Theodore Roosevelt~~

  6. #6
    Join Date
    May 2007
    Location
    Hawaii
    Posts
    12,452
    Downloads
    31
    Uploads
    0

    Re: 60-year-old (at least) Bias Cutting Tutorial

    awesome!!
    ~Marilyn~


    To view links or images in signatures your post count must be 0 or greater. You currently have 0 posts.

    To view links or images in signatures your post count must be 0 or greater. You currently have 0 posts.

    To view links or images in signatures your post count must be 0 or greater. You currently have 0 posts.

    ~~Maui 2011~~


    To view links or images in signatures your post count must be 0 or greater. You currently have 0 posts.


    To view links or images in signatures your post count must be 0 or greater. You currently have 0 posts.

    To view links or images in signatures your post count must be 0 or greater. You currently have 0 posts.

    To view links or images in signatures your post count must be 0 or greater. You currently have 0 posts.


    To view links or images in signatures your post count must be 0 or greater. You currently have 0 posts.


    To view links or images in signatures your post count must be 0 or greater. You currently have 0 posts.

  7. #7
    Join Date
    Jan 2007
    Location
    Deep in the heart of Texas
    Posts
    19,725
    Downloads
    229
    Uploads
    21

    Re: 60-year-old (at least) Bias Cutting Tutorial

    That is how I always make mine. Thanks for sharing.
    Mel- mom to my two busy B's

    My sewing blog-
    To view links or images in signatures your post count must be 0 or greater. You currently have 0 posts.

    My gluten-free blog-
    To view links or images in signatures your post count must be 0 or greater. You currently have 0 posts.

  8. #8
    Join Date
    Jan 2009
    Location
    New Mexico
    Posts
    1,347
    Downloads
    71
    Uploads
    0

    Re: 60-year-old (at least) Bias Cutting Tutorial

    Thank you for showing this it now makes sense, I am going to save a lot of time with this.
    Melissa


    To view links or images in signatures your post count must be 0 or greater. You currently have 0 posts.

  9. #9
    Join Date
    Jul 2013
    Location
    London
    Posts
    7
    Downloads
    0
    Uploads
    0

    Re: 60-year-old (at least) Bias Cutting Tutorial -

    Thank you for your tutorial

  10. #10
    Join Date
    Nov 2009
    Location
    North Carolina
    Posts
    5,079
    Downloads
    103
    Uploads
    0

    Re: 60-year-old (at least) Bias Cutting Tutorial -

    Yea I do it that way too!!!
    [SIGPIC][/SIGPIC]

    Chris


    To view links or images in signatures your post count must be 0 or greater. You currently have 0 posts.

    SveetaGirl Creations

  11. #11
    Join Date
    Jul 2007
    Location
    NK, RI
    Posts
    7,375
    Downloads
    105
    Uploads
    0

    Re: 60-year-old (at least) Bias Cutting Tutorial -

    I make mine in a similar way, but I start with a square, cut it into 2 triangles, stitch it into a bias parallelogram then proceed as instructed here. I get about 5 yards of double fold bias tape from a fat quarter of fabric with a 4" x 18"piece left over from making my initial square. I also do it with other size squares of fabric. You'll find similar instructions for cutting continuous bias binding in may current quilt publications.

    To view links or images in signatures your post count must be 0 or greater. You currently have 0 posts.

    To view links or images in signatures your post count must be 0 or greater. You currently have 0 posts.

    To view links or images in signatures your post count must be 0 or greater. You currently have 0 posts.

    To view links or images in signatures your post count must be 0 or greater. You currently have 0 posts.


    To view links or images in signatures your post count must be 0 or greater. You currently have 0 posts.


    To view links or images in signatures your post count must be 0 or greater. You currently have 0 posts.

    To view links or images in signatures your post count must be 0 or greater. You currently have 0 posts.

  12. #12
    Join Date
    Apr 2006
    Location
    here, usually :)
    Posts
    25,123
    Downloads
    77
    Uploads
    8

    Re: 60-year-old (at least) Bias Cutting Tutorial -

    @Helenanne, that sounds like how I do it, too.

    To view links or images in signatures your post count must be 0 or greater. You currently have 0 posts.
    ~ kelly ~

    mom to Alex, Zoe and Jack

    my ISO:
    Snoopy Embroidery CDs
    dies for metal snaps to fit an OSDS press & 14/16 metal snaps

    Visit Sewing Mamas'
    To view links or images in signatures your post count must be 0 or greater. You currently have 0 posts.
    !
    Find Sewing Mamas on
    To view links or images in signatures your post count must be 0 or greater. You currently have 0 posts.
    !
    Tweet with
    To view links or images in signatures your post count must be 0 or greater. You currently have 0 posts.
    !
    Check out the Sewing Mamas
    To view links or images in signatures your post count must be 0 or greater. You currently have 0 posts.
    !

  13. #13
    Join Date
    Sep 2011
    Location
    Midwest
    Posts
    243
    Downloads
    17
    Uploads
    0

    Re: 60-year-old (at least) Bias Cutting Tutorial -

    I learned this from my grandmother (probably using the same book...) and I honestly didn't know there was another way to do it. Thanks for sharing this, April!

  14. #14
    Join Date
    Jul 2010
    Location
    Herndon, Virginia
    Posts
    1,783
    Downloads
    23
    Uploads
    0

    Re: 60-year-old (at least) Bias Cutting Tutorial -

    This is brilliant! I just finished making my first bias tape and it was so very easy, I may be tempted to make something else with bias tape. Thank you! BTW I put my loop of fabric around my office chair and rolled it around while cutting it. Way easier than cutting it flat.
    (yet another) Kelly - Mama to 10 year old sweet Sierra and 4 year old hurricane Katy, two rambunctious Jack Russells, Bogey and Betty, a tuxedo cat named Bubblegum the SuperCat and the Hubs, Mark

Posting Permissions

  • You may not post new threads
  • You may not post replies
  • You may not post attachments
  • You may not edit your posts
  •