Organizing Sewing Supplies with Scrapbooking Storage
- At January 14, 2014
- By Kelly
- In Organization
 1
1
Organizing things makes me really happy. I remember watching HGTV years ago and seeing someone whose job title was Professional Organizer. I thought that was about the coolest thing ever. Seriously, getting paid to go nuts in the Container Store and then sorting someone else’s stuff to take it from messy to beautiful? What could be better?
The scrapbooking section of the craft store is a great place for organizing supplies for your sewing space. It makes sense – scrapbookers have lots of little bits and bobbles to keep track of.

This is a photo storage box. The box holds 16 individual boxes that are designed to hold 4×6″ photos. It has a handle so it’s easy to transport, and it closes securely.
Here’s a picture of it open, it’s a little easier to see the slots that the smaller boxes sit in.

My plan for these was to store my size tags and decorative tags in them. I was pleasantly surprised to discover that I had extra spots once I had put the tags in.
Here’s a close up of one of the small boxes open so you can get a better idea of the depth. The are about an inch deep. I used some of the boxes for magnetic snaps, key fob parts, boxer elastic, webbing…

These would also be great for buttons and snaps.
Organizing seems to be a love it or loathe it kind of thing. Where do you fall?
Kelly
Organizing the Kids
- At January 11, 2014
- By Kelly
- In Organization
- 1
Every January, I think this will be the year we all get organized. Retailers hop on the bandwagon, touting storage accessories and planners.
Several years ago, I put a big white board on the kitchen wall. It usually has a grocery list running down one side of it and my husband has been using it lately to plan meals. Sometimes there are parts of a calculus problem that I was explaining to my high schooler, other times there are math problems of the second or fourth grade variety.
Last fall, I started writing weekend to-do lists on it for the kids. If I put up a list, the younger kids would bang right through it and get everything done without my having to nag them. They would get up on Saturday morning, see what they had to do, and get it done.
What if we could do that every day? If everyone knows what’s expected and the list is right there so I don’t forget, it should be easier, right? And if they do their jobs, then I will have more time to do what I want to do – like sew! :)
Yesterday I updated the board. Ta-da!

The meal plan goes along the top, then there is a row for each of the kids’ jobs and activities for each day. Now they can see what’s expected, I don’t have to listen to arguing about whose turn it is to set the table, and scheduled activities are visible for everyone.
My husband and I use google calendar, which is great because the kids’ sports activities all have ical feeds that automatically update when times and locations change, but that didn’t help the kids to know what was going on. This should help with that, too.
Want to make your own? It’s easy!
My whiteboard is actually a 4×8′ sheet of shower board from Home Depot. It’s lightweight and much less expensive than a “real” whiteboard. Dry erase markers wipe right off. And, you can cut it to whatever size will fit in your space. Ours is 4×6′. The lines are 1/2″ electrical tape. The tape is sold in multi-color packs of 20′ per color, so if you want all the lines to be the same color, you will need to buy multiple packages. I’m just going to work on trying not to be too bothered by having 3 different colors on there.
Here’s a close-up of one of the squares.

Activities are purple, responsibilities are green. The kids can erase them as they are completed. We are off to a good start – everyone emptied their lunchboxes and put the ice packs in the freezer after school yesterday.
Happy Organizing!
Kelly
Ottobre Sewing Pattern Organization – take 2
- At May 17, 2013
- By Kelly
- In Organization, Patterns
- 3
I’ve warned you about my love of organizing things, right?

I haven’t been sewing much since I went to quilt class, but I did a bit of organizing.
At some point, we were discussing organizing magazines and Bobolots (her forum name) said these were great for magazines. I checked them out and they are great! More on that in a moment. Check these out!
When they first arrive, six of them are stuck together:

So you pull them apart:


Then you take out the middle piece – this is where the magazine pages will slide through.

And then you need to poke out the little holes for the binder rings to go through. You can stack a couple of these together and push them out.

I put mine over a couple of my pattern weights because it’s easy to push through the holes that way and the little plastic pieces don’t go flying all over.

For the children’s issues, I use two binder holders because it just seemed like it needed the extra strength. I’m not sure it was necessary, but I had enough, so I just went with it. :)

You can just slide them over one corner a bit…

And then all the way to the middle of the magazine:

Hopefully you slid it through with the holes on the outside:

And then the holes just go in the binder rings!

Stick them all in binders and you’re set. So pretty….
I highly recommend the seller named rvbookseller listed in the “new from” link, especially if you want to get a whole bunch. That seller also offers them in a pack that contains 120 of them for a very reasonable price. When you buy them individually, the shipping is killer. The seller shipped quickly and answered my questions with lightning speed as well. The link is a Sewing Mamas affiliate link, but I’d recommend the seller even without it. :)
You didn’t notice that my Ottobre changed to three different issues along the way, did you? No, you’re too nice to mention it, thank you! ;)
Happy Organizing!
Kelly
Sewing and craft rooms
- At January 24, 2013
- By Kelly
- In Organization
- 4
I love looking at other people’s sewing and crafting spaces. I came across a site full of home decorating ideas and thought I’d share some of the spaces with you.
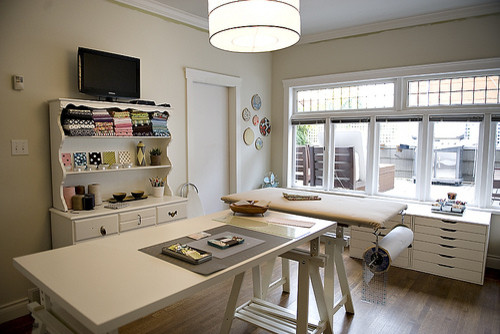
So many of these spaces use IKEA furnishings, this one is no exception. The drawers near the window are from the Vika Alex line, the table top from Vika Amon and legs from Vika Artur. The same trestle leg is used for what appears to be an ironing board, with a roll of tracing paper handy from below. One of the cool things about the Artur legs is that you can adjust each side separately to put the table top at an angle if you like. I have a set of drawers from the Alex line and a couple of the Vika Amon tables in my sewing space now and they’ve held up well.
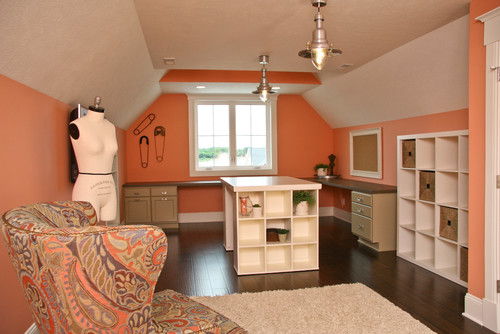
This room looks like IKEA Expedit shelves in white with the Vika table top in the center island. I love the huge safety pins on the wall in this one!
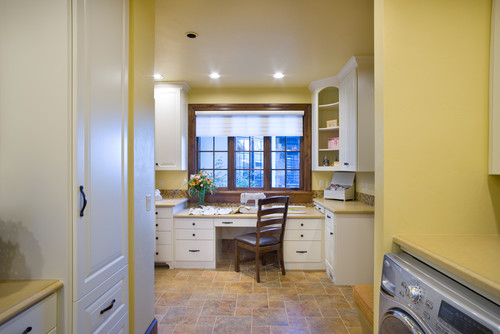
Having the laundry machines easily accessible to the sewing space is a plus here. Being able to toss fabrics in for prewashing is great, and if you use your washer for dyeing materials, the proximity is great. In my mind’s eye, there’s a sink in that laundry space as well. The other thing I love is the natural light.
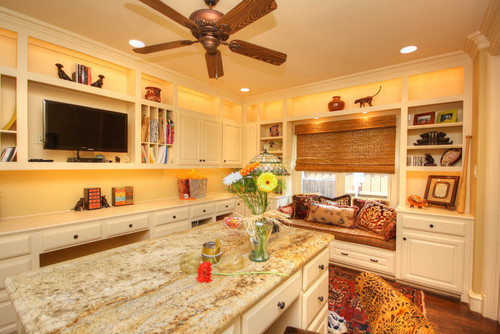
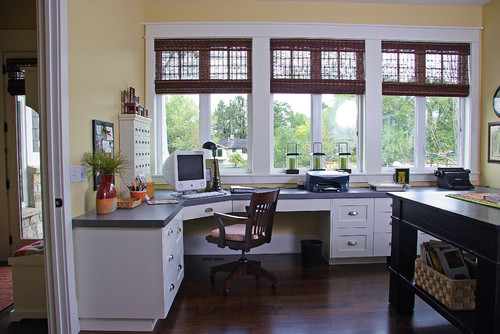
Lots of counter workspace for sewing and embroidery machines with a nice island for cutting fabrics here, but I also love the window seat. I see one of my kids cozied in there with a book or just coming in to talk about their day while I’m working.
Oh, the possibilities!
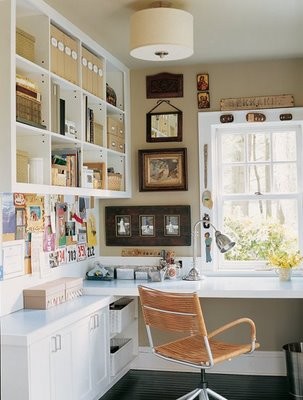
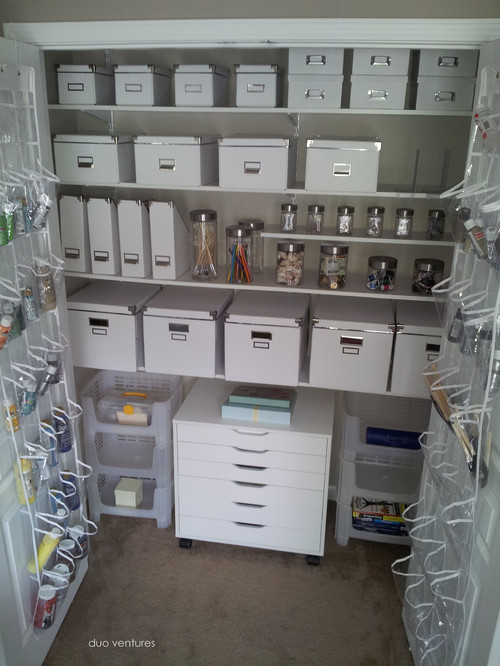
More wonderful light here, a great place to work! I also love the white cabinets and the darker wood flooring and island. I’m filling that little cabinet of drawers in the corner with various sewing notions…
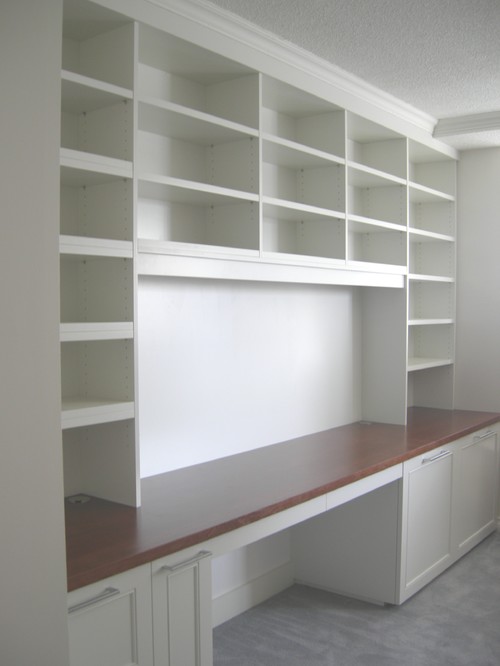
The shelves in this room go all the way to the ceiling, love those. And in the corner, the cabinets change into open shelving to use the available space under the countertop desk area.
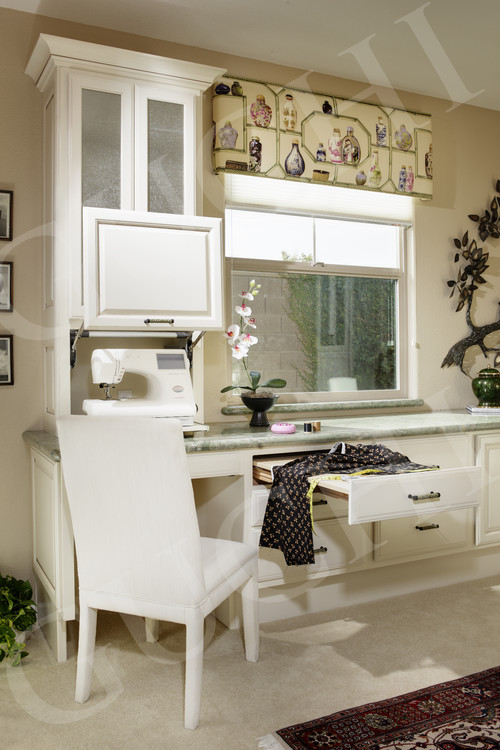
Giving the sewing machine it’s own little garage is a great idea. I’d love to see it with a roll top (like the classic bread boxes) or with doors that open and recess into the cabinet, though. I see my clumsy self hitting my head on the raised cabinet door in this setup. The pull out board for cutting (or ironing?) is a wonderful extension of space.
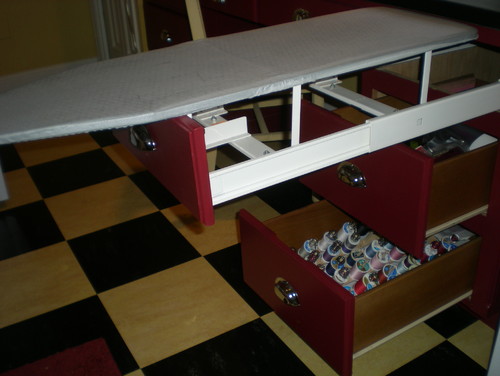
I like the idea of a large ironing board that pulls out from a drawer, but I’m not sure about this one. What do you think?
Oh, IKEA how I love you…
There are, of course, about a zillion more. 321,889 filed under “craft room” to be exact. Here’s a link – just try not to stay there surfing all day, there’s sewing to do!
Happy daydreaming!
Kelly
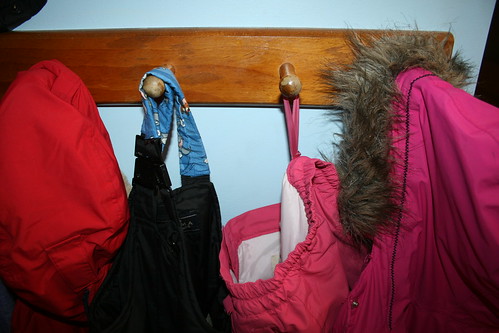
Quick fix for kids’ winter gear!
Here’s a quick and easy way to keep track of your child’s snowpants, because having a name on the label means nothing to a little kid just trying to get on the closest pair of black snowpants as quickly as he can to go outside. You know, the black snowpants that look like every other pair in the school?
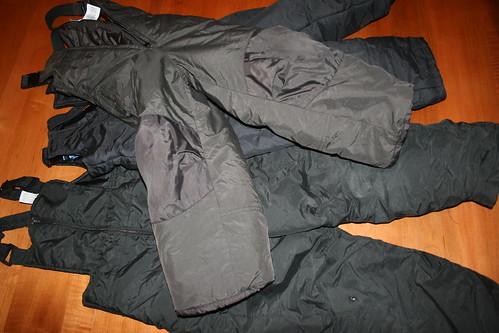
Oh, yeah, those.
Snowpants strap covers!
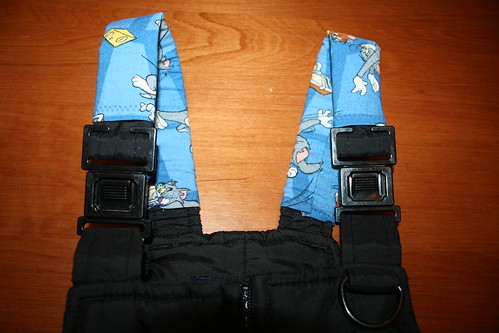
These are super quick and easy if the shoulder strap can come completely off the closure. These can:
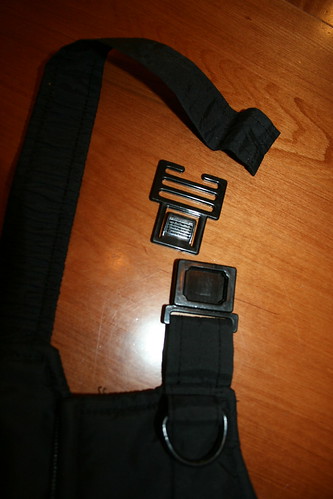
These are sewn to keep the strap attached to the closure,
and this is nice for a ton of reasons, but will add extra work for us, see bottom of post at the **.
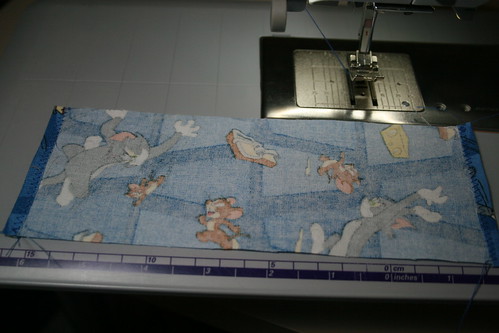
We’ll talk about the first type first. The pair we’re working with has a strap that’s 1.25″ wide*.
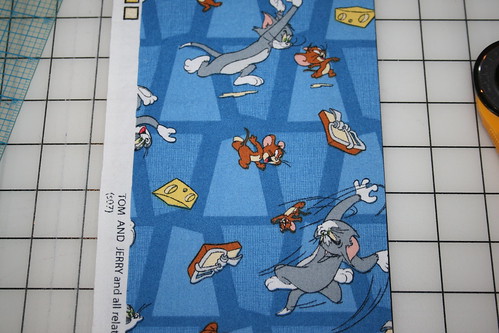
Fun fabrics are great for this –
To make two strap covers you will need:
2 pieces of cotton woven (or quilter’s) fabric, each 3″ wide by 8″. You can make them longer or shorter if you like.
These are sewn with a 1/4″ seam allowance. If you want a wider seam allowance, increase the 3″ width by 2 times your additional amount. (If you want to instead sew with 1/2″ seam allowance, you’re adding 1/4″ more to each sewn side, so cut your pieces 3.5″ x 8″.)
* If your snowpants have a wider strap, simply measure the width, add the seam allowance and double the result.
(width+seam allowance)*2=width of cut fabric
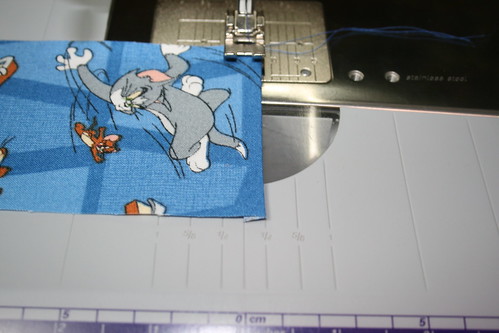
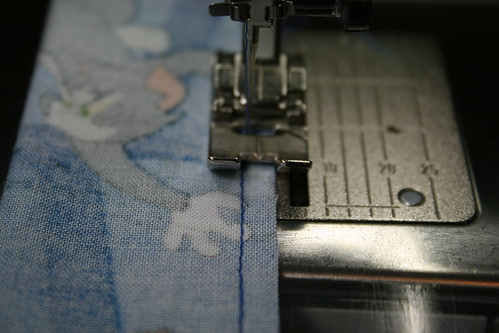
Step 1
Hem the short sides. Press wrong sides together 1/4″.

Zigzag the hem so it goes just over the cut edge. (You can do this on the wrong side instead of the right side if you like.)
Step 2
Zigzag opposite end.
Step 3
Fold the piece in half the long way, right sides together. I like to press this because then I don’t need to pin it.
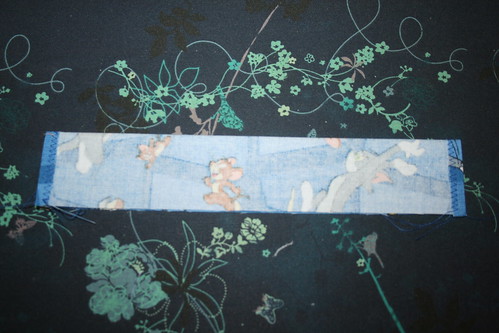
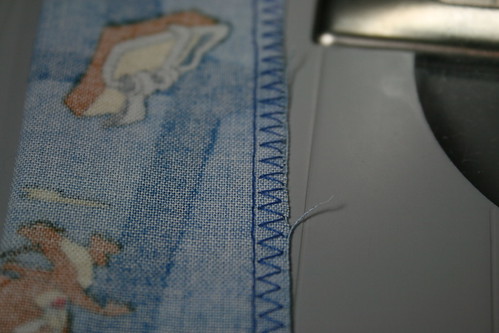
Step 4
Stitch together with 1/4″ seam allowance.
How nice!
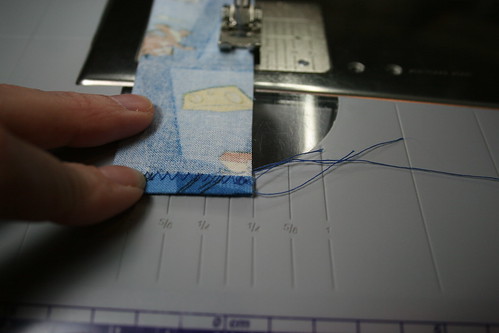
Step 5
Zig zag in the seam allowance to keep it from fraying. I find if I line up my straight stitching so it’s just barely visible where the presser foot sticks up on the left, it stitches in just the right place.
Then you have this:
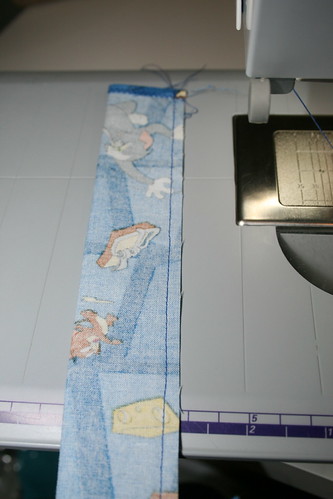
Step 6
Trim threads. Turn it right side out.
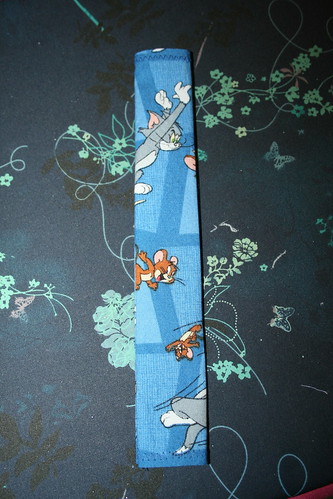
Slide your strap into the tube you’ve just made, that’s it!
Bonus Tip!
If your child wears the snowpants without the bib overalls, sew a ribbon loop to the inside at the waist so they can be easily hung on a hook. This keeps things tidy and helps them dry faster than when they are left in a pile.
~o~o~o~o~o~o~o~o~o~o~o~o~o~o~o~o~o~o~o~o~o~o~o~o~o~o~o~o~o~o~o~
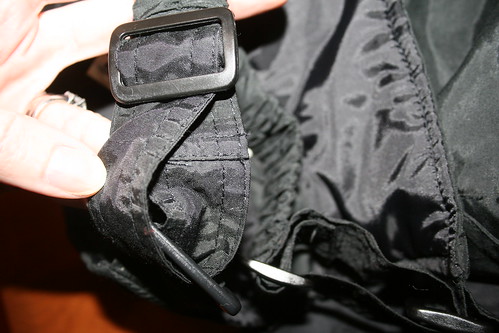
** If your snowpants have a strap that’s sewn together to keep it from coming off the closure, you have a few options.
Option 1:
Grab your seam ripper and use it to free the strap so you can take it off the closure. When your strap cover is completed and on the snowpants, re-sew the part you seam ripped. (This will make the neatest cover and is also the quickest. Just make sure you’ll be able to sew it back together before you seam rip it! I strongly recommend only removing one strap at a time so you can see how it goes back on.)
Option 2:
Make your strap cover wide enough to go over the closure. To do this, take your measuring tape and measure all the way around the widest part of the closure. Double your seam allowance and add that to your measurement. The result is your fabric width. (This will result in a cover that may be a little slide-y.)
Option 3:
Instead of making a tube, use Velcro-like closures in a manner similar to the way we made our luggage handle covers, skipping the interfacing to avoid its added stiffness. (This will take the longest.)
Happy Sewing!
Kelly


