User Tag List

Page 1 of 3 123 LastLast
Results 1 to 20 of 59

Thread: Reverse Applique Tutorial (in downloads)

  1. #1
    Join Date
    Jun 2007
    Location
    Washington
    Posts
    2,533
    Downloads
    14
    Uploads
    0

    Reverse Applique Tutorial (in downloads)

    Here's how I've been doing my reverse applique tops, I just love how these turn out!

    Aside, whenever I post how to do something, I worry that someone will tell me that's not how it's really supposed to be done. This is how I do it, it works for me. If you know another way, good for you. I hope this helps those of you who are wanting to try this out, but need a little nudge.

    First, choose your design. For a first try, I recommend a simple shape (the toes on my froggie were a bit tricky, so try something with fewer turns at first, then you can progress to more difficult images). I use google image search when I'm looking for ideas, I search, for example, "frog silhouette" and see what comes up. If you find the perfect image, use that, or you can draw an image inspired by what you find.

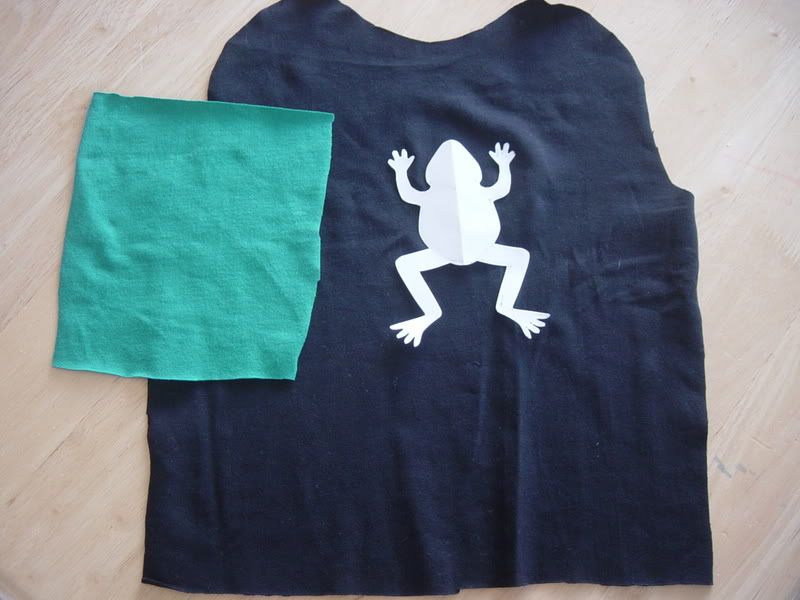
    Here is my shirt front, contrast fabric, and the froggie I drew (I drew one half, folded the paper and cut it out, so it's symmetrical). I cut out my image so I can sew around it, but you could put it on tissue paper or the like and sew through it, you'd just have to pick the paper out of the stitches later.


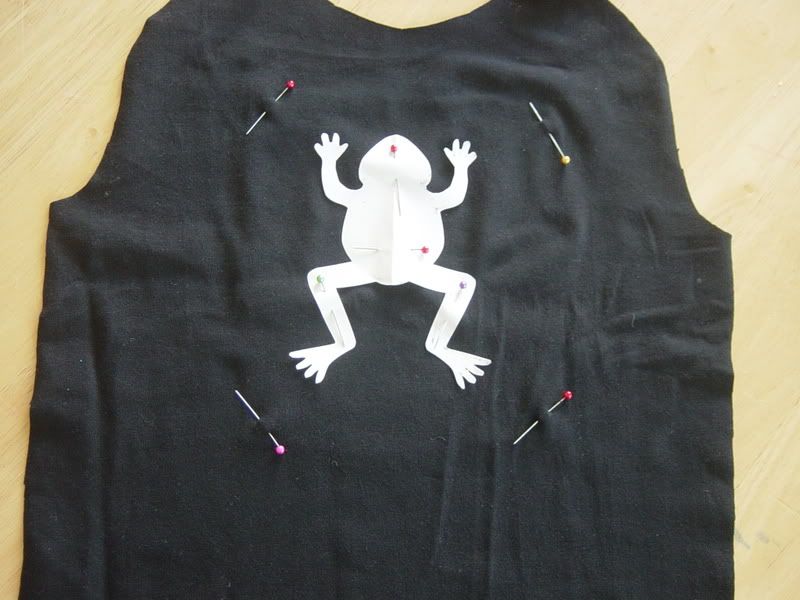
    I place the contrast fabric behind my shirt front, making sure there's plenty of room around the edges, then place the image on top of the shirt front, pinning everything in place. I like to center the image from side to side, but place it more to the top of the shirt.


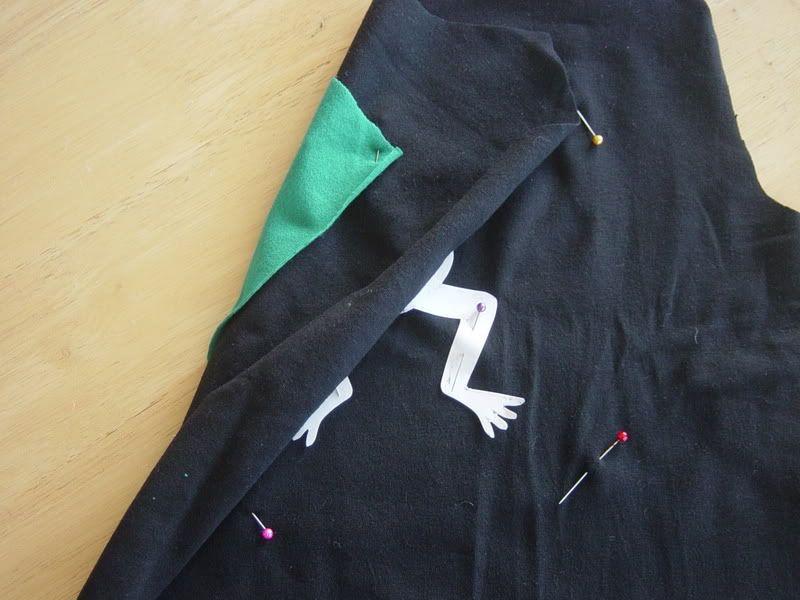
    Here you can see the contrast fabric pinned on behind:


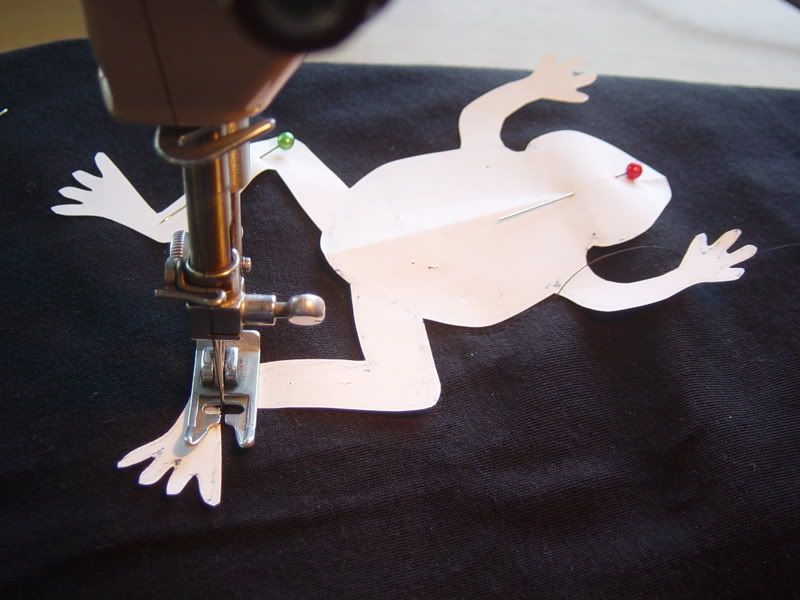
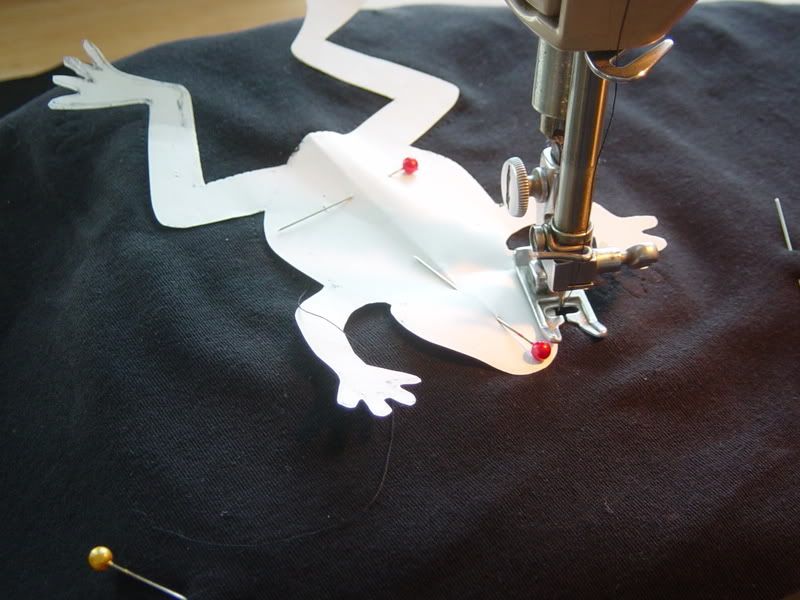
    Now, you'll use a fairly short stitch length to sew around your image. I started at the froggie's "armpit", stopping with needle down to pivot at any turns:


    Here's another shot, a bit further around the frog. Stop to take out/reposition any pins that are in your way, but be careful not to skew your template from where it started.


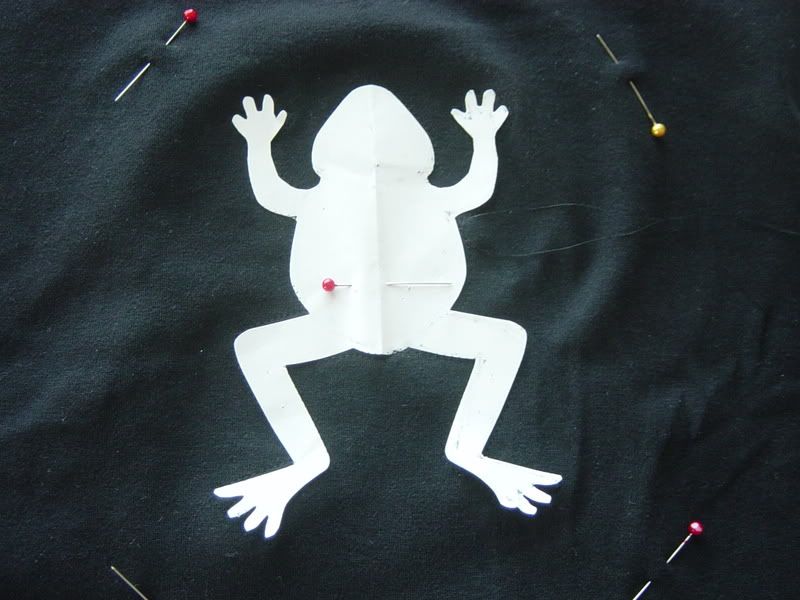
    Whew! I made it all the way around!


    And, after I take out the pins/template:


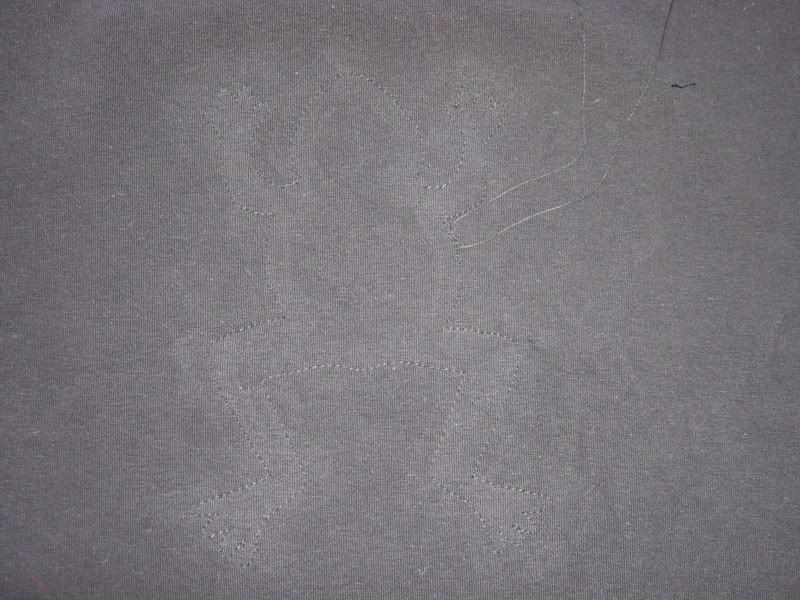
    Here's what it looks like from the back, you can see the stitching better here:


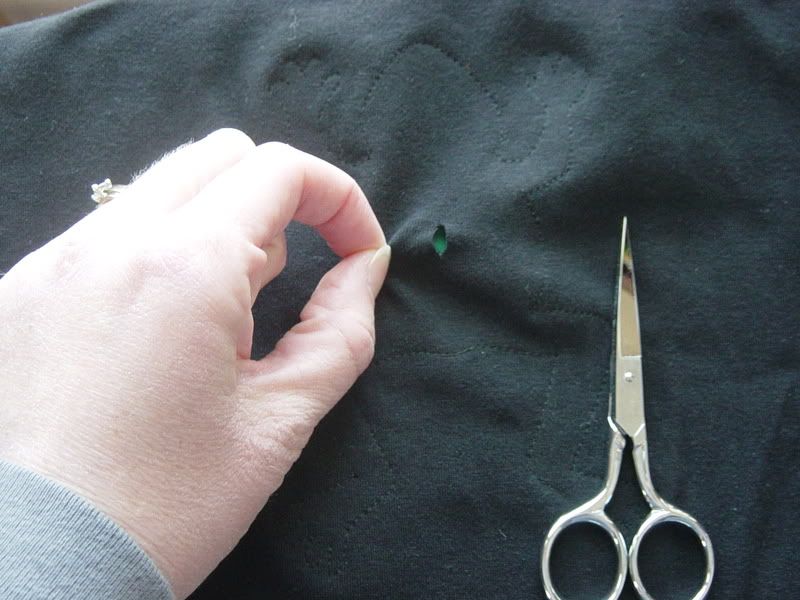
    Now, I use a small, sharp pair of scissors to cut out the image from my shirt front, just inside the stitching line. Since knits do not ravel, I leave the edges unfinished. I like the vintage look the edges get when they roll a bit after being washed.

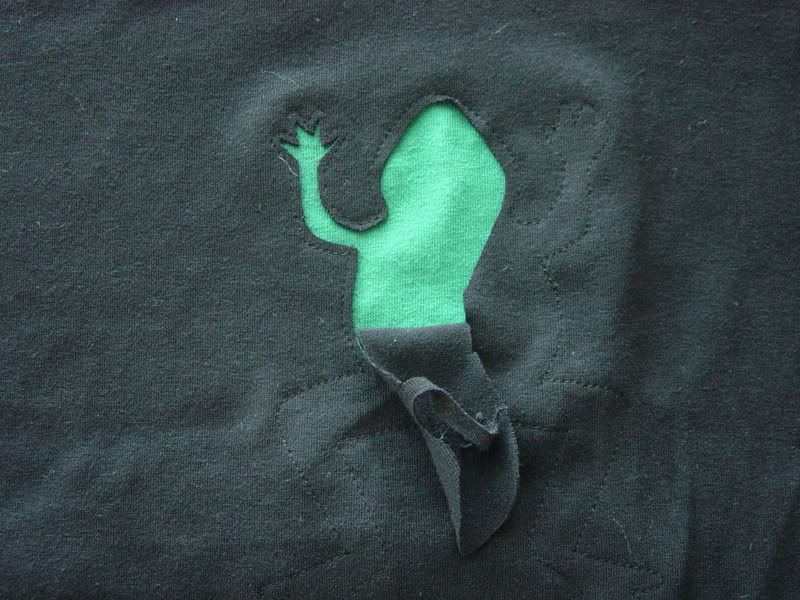
    Start by pulling the layers apart and snipping a little in the middle. You do not want to cut through your contrast fabric, so be careful!


    I put my hand behind the contrast fabric while I'm cutting, so I know I'm only cutting the shirt panel (black fabric here):


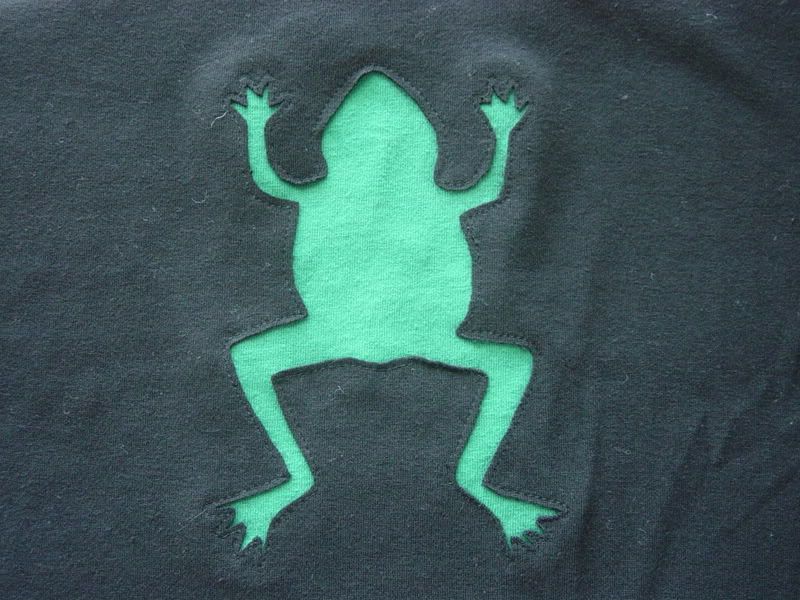
    Now, I'm done trimming out my applique! Stop and admire your work:


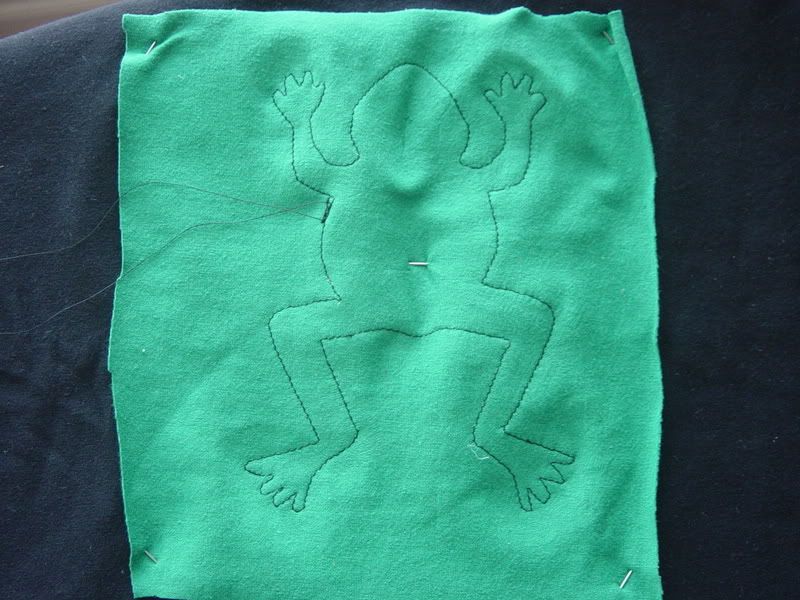
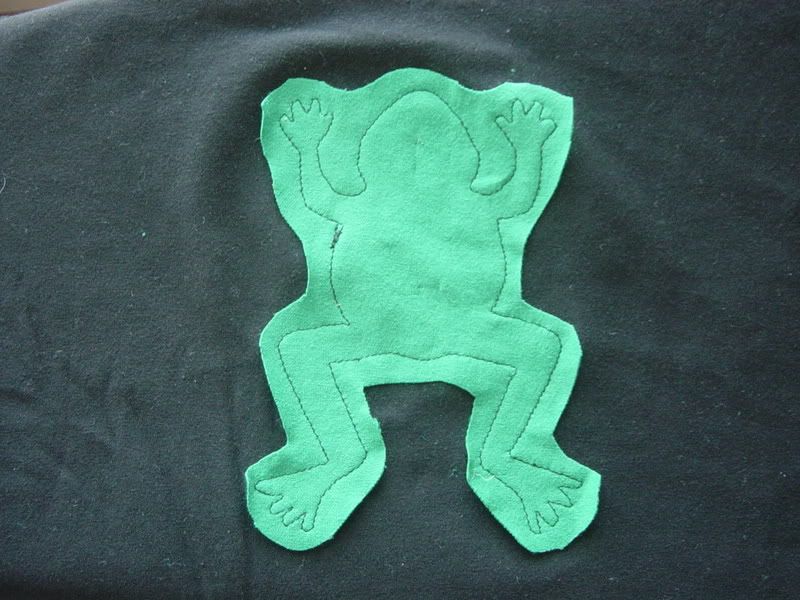
    On the back, you'll want to trim away the extra contrast fabric:


    Now, sew up your shirt, and wait for the compliments to start rolling in!
    Katie.
    ---my goalie girl---

    To view links or images in signatures your post count must be 0 or greater. You currently have 0 posts.

  2. #2
    Join Date
    Jul 2007
    Location
    The Bronx
    Posts
    7,722
    Downloads
    140
    Uploads
    0
    that's really cool looking! thanks.
    [SIGPIC]
    To view links or images in signatures your post count must be 0 or greater. You currently have 0 posts.
    [/SIGPIC]
    I live for that face.

  3. #3
    Join Date
    Oct 2007
    Location
    Los Angeles
    Posts
    775
    Downloads
    8
    Uploads
    0
    That's awesome! Thanks!

    And I don't know of many things whereby there is only 1 way to do it. As far as I'm concerned, YOURS is the RIGHT way!

    To view links or images in signatures your post count must be 0 or greater. You currently have 0 posts.


    [SIGPIC][/SIGPIC]

  4. #4
    Join Date
    Feb 2007
    Location
    Small Town, NC
    Posts
    586
    Downloads
    46
    Uploads
    0
    I am going to have to try this! Thanks!

    To view links or images in signatures your post count must be 0 or greater. You currently have 0 posts.

    To view links or images in signatures your post count must be 0 or greater. You currently have 0 posts.

  5. #5
    Join Date
    Sep 2007
    Location
    Central Florida
    Posts
    837
    Downloads
    52
    Uploads
    0
    Very cool tutorial! I'm thinking you could use temporary spray adhesive to help keep your template in place. Or washable glue.

    Thank you for doing the great tutorial!
    Karrie, married to my sweetheart and Mom to Austin 11, Harrison 7, Haddon 5 and Ava-Grace 3

    To view links or images in signatures your post count must be 0 or greater. You currently have 0 posts.


    To view links or images in signatures your post count must be 0 or greater. You currently have 0 posts.


    To view links or images in signatures your post count must be 0 or greater. You currently have 0 posts.


    To view links or images in signatures your post count must be 0 or greater. You currently have 0 posts.

    Sewing blog:
    To view links or images in signatures your post count must be 0 or greater. You currently have 0 posts.

  6. #6
    Join Date
    Aug 2006
    Location
    Austin TX
    Posts
    4,690
    Downloads
    178
    Uploads
    0
    I'm addicted to reverse applique, and that's pretty much the way I do it, too.
    Here are a few other tips & tricks: I use iron-on, tear-away stabilizer to keep my 'reverse' fabric from moving. Oh, and I usually draw my design on with a water soluble marker so that I don't have to pin a template on.

    But kat's applique's are way cooler than mine, so I should hush up now. ;)
    Mama to Noah (Aug 03), Owen (Jun 06), and Rosa (Feb 11)

    To view links or images in signatures your post count must be 0 or greater. You currently have 0 posts.

    To view links or images in signatures your post count must be 0 or greater. You currently have 0 posts.

    To view links or images in signatures your post count must be 0 or greater. You currently have 0 posts.

    To view links or images in signatures your post count must be 0 or greater. You currently have 0 posts.

    To view links or images in signatures your post count must be 0 or greater. You currently have 0 posts.

    Come visit my blog!
    To view links or images in signatures your post count must be 0 or greater. You currently have 0 posts.

  7. #7
    Join Date
    Jul 2005
    Location
    Northern California
    Posts
    9,791
    Downloads
    24
    Uploads
    1
    Awesome! I think your way is much better than how I tried in the past.


  8. #8
    Join Date
    Jan 2008
    Location
    British Columbia, Canada
    Posts
    102
    Downloads
    3
    Uploads
    0
    so cute!!! thanks for the tut!
    ** Sarah **
    SAHM to Robyn and Ollie, wife to Curt


    Very green with the sewing machine


    To view links or images in signatures your post count must be 0 or greater. You currently have 0 posts.

  9. #9
    Join Date
    Dec 2006
    Location
    australia
    Posts
    3,247
    Downloads
    61
    Uploads
    0
    Thank you . Can't wait to try it
    sewing for my little ones
    DS 12/03 and DD 03/06


    To view links or images in signatures your post count must be 0 or greater. You currently have 0 posts.

  10. #10
    Join Date
    Nov 2006
    Location
    Northern CA
    Posts
    3,710
    Downloads
    56
    Uploads
    10
    Awesome idea to just use the paper cutout as your guide! I like your version, it's great.
    Krista~ Mommy to Kyra 7-31-05 & Logan 12-30-08


    To view links or images in signatures your post count must be 0 or greater. You currently have 0 posts.

  11. #11
    Join Date
    Apr 2008
    Location
    southwest Minnesota
    Posts
    4,434
    Downloads
    102
    Uploads
    0
    That's awesome! The cute little toes make the froggy, as far as I'm concerned! Definitely going to have to try this!

  12. #12
    Join Date
    Nov 2007
    Location
    Pacific NW
    Posts
    5,231
    Downloads
    49
    Uploads
    0
    Thanks...that looks great! I can't wait to try it. I know what you mean about worrying about posting how to do things. I feel the same way Your way looks great to me!
    Kristin
    Mommy to 3 sweet boys and now, a girl!

    To view links or images in signatures your post count must be 0 or greater. You currently have 0 posts.

  13. #13
    Join Date
    Jul 2005
    Location
    WA
    Posts
    4,880
    Downloads
    30
    Uploads
    0
    That's going to be one cute shirt! Thanks for showing ;)
    ~Lorissa


  14. #14
    Join Date
    Jul 2006
    Posts
    4,552
    Downloads
    3
    Uploads
    1
    Just wanted to say that is a cute design! That is the only way I know to do it too, so I think you have the right way, LOL!
    Mama to Dustin(3/94),Skylar(5/96),Noah(5/03) and Tristan(8/10). Expecting a Grand Baby Girl 12/16 !!
    Always Missing Our Angel Girl Meagan(8/88 - 11/15)

    To view links or images in signatures your post count must be 0 or greater. You currently have 0 posts.

  15. #15
    Join Date
    Apr 2008
    Location
    WV
    Posts
    13
    Downloads
    1
    Uploads
    0
    Love this!! I can't wait to try it - thanks for sharing!

  16. #16
    Join Date
    Feb 2008
    Location
    atlantic canada
    Posts
    97
    Downloads
    16
    Uploads
    0
    ohhh noooo.......... I've just been inspired...... I jsut have to try it, and maybe learn to spell aswell...LOL


    "Thanks sew much" Nancy

  17. #17
    Join Date
    Mar 2007
    Location
    Home of the Colts & too far from WDW
    Posts
    298
    Downloads
    21
    Uploads
    0
    WOW!~ That is awesome, thanks so much for sharing the tut- things like that will be perfect for my little man, I am so excited to try that this weekend.
    ~*~ Megan~*~
    Blessed to be Asher and Ike's Momma
    Living our dreams with the love of my life, Tony
    I'd rather be in WDW

  18. #18
    Join Date
    Apr 2008
    Location
    Florida
    Posts
    2,331
    Downloads
    11
    Uploads
    0
    THat's cool. I'm going to have to try that!

  19. #19
    Join Date
    Feb 2008
    Location
    back in the USA
    Posts
    3,994
    Downloads
    35
    Uploads
    0
    Wow thanks for sharing that. I can't wait to try it out.
    Maria, loving navy wife, mom to growing preemie ds (11/04), a hurricane in disguise dd (8/09) and bonus ds (11/12).


    To view links or images in signatures your post count must be 0 or greater. You currently have 0 posts.


    To view links or images in signatures your post count must be 0 or greater. You currently have 0 posts.

  20. #20
    Join Date
    Apr 2008
    Location
    Wisconsin
    Posts
    84
    Downloads
    28
    Uploads
    0
    Exactly what I have been searching for. Thanks so much !!
    Niki WAHM to Devin (7) & Haven (3)


    To view links or images in signatures your post count must be 0 or greater. You currently have 0 posts.

    (I need a banner or something
    To view links or images in signatures your post count must be 0 or greater. You currently have 0 posts.
    )

Page 1 of 3 123 LastLast

Posting Permissions

  • You may not post new threads
  • You may not post replies
  • You may not post attachments
  • You may not edit your posts
  •