User Tag List

Results 1 to 4 of 4

Thread: Felt cupcakes with interchangeable toppings

  1. #1
    Join Date
    May 2011
    Location
    United Kingdom
    Posts
    1,093
    Downloads
    37
    Uploads
    0

    Icon7 Felt cupcakes with interchangeable toppings

    I came up with this idea and as it actually worked and I learnt absolutely all my sewing skills from online tutorials I thought it was time to give something back and make a tutorial myself!

    So here goes…

    Felt Cupcakes with Magnetic Interchangeable Toppings


    Materials:
    - felt - I HIGHLY recommend pure wool felt. It’s pure joy to work with and tends to last much longer than acrylic. Also acrylic felt tends to tear at the seams whereas wool felt does not.

    - needle and thread in matching colours. I use embroidery floss.

    - cardboard. I just cut up the boxes my Amazon orders came in

    - strong magnets. Two opposing ones per cupcake.

    - hot glue gun


    For the pattern you can either cut up a paper cupcake liner and tweak it - that’s what I did. Or you can Google a pattern, there are a few free ones around.


    Step 1:
    Cut your felt and cardboard.
    Felt pieces: cupcake side x1, cupcake base x1, cupcake lid x 1, cupcake topping tops x 2 (these are the same piece as cupcake lid).
    Cardboard pieces: same piece as felt cupcake top x 2, same as cupcake base x1
    In this example my cupcake base, lid and topping tops are light yellow and my cupcake side is beige.


    Step 2:
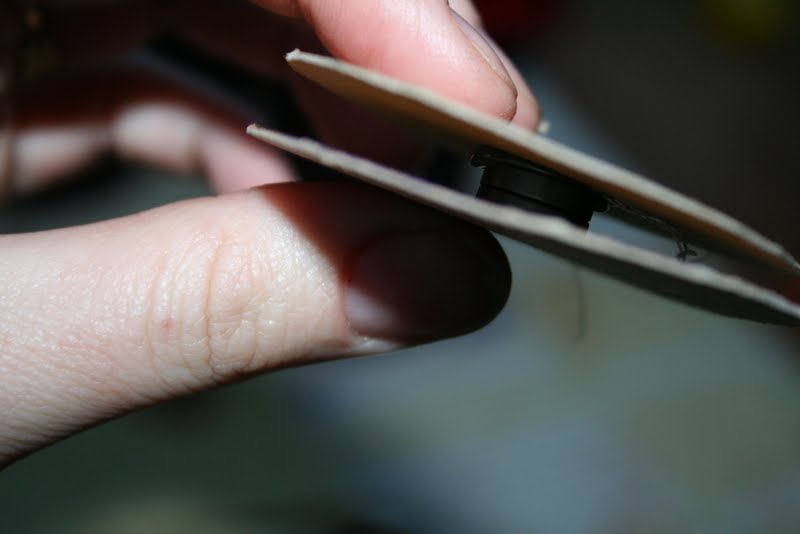
    Hotglue the magnets on to the two larger cardboard circles.


    Make sure you glue the magnets in such a way that they attract each other!
    (sorry about the dark picture )


    Step 3:
    Whipstitch both short ends of the cupcake side together


    Step 4:
    Whipstitch the cupcake base the top bottom of cupcake side


    Step 5:
    Put smaller cardboard circle into the base of the cupcake (you may need to trim the cardboard circle a bit)


    Step 6:
    Whipstitch the cupcake lid to the top of cupcake side but stop when you reach halfway round,
    Fill the cupcake with stuffing.
    Place one of the large cardboard circles over the stuffing. Make sure the magnet is facing up!


    Whipstitch the cupcake shut.

    And there you have it! A cupcake!

    Now for the topping…

    Step 7: Make topping embellishments. Here I made some tangerine segments:
    I cut out two large kidney-shaped pieces of orange felt:


    I whipstitched them together leaving an opening for stuffing:


    Put in a few long stitches to decorate:


    Insert stuffing and whipstitch shut:


    Step 8: Take one of the large felt circles and stitch the embellishments on..


    Step 9:
    Take the remaining felt circle and the second cardboard with magnet and sandwich like so (I hadn‘t decorated the top of this one). Make sure the magnet faces the non-embellished felt circle!


    Whipstitch all around:


    And you’re done!


    Make more in different ‘flavours’ and you’ll have interchangeable cupcakes!


    Hope you enjoyed this.
    Let me know if you have any questions and I’ll try to help!
    Last edited by mom2a2z; 01-22-2013 at 11:30 PM. Reason: fixing an image tag :)
    Home schooling mummy in the UK to four .

  2. #2
    Join Date
    Jan 2007
    Location
    Deep in the heart of Texas
    Posts
    19,725
    Downloads
    229
    Uploads
    21

    Re: Felt cupcakes with interchangeable toppings

    What a fun idea! Thanks for the tutorial!
    Mel- mom to my two busy B's

    My sewing blog-
    To view links or images in signatures your post count must be 0 or greater. You currently have 0 posts.

    My gluten-free blog-
    To view links or images in signatures your post count must be 0 or greater. You currently have 0 posts.

  3. #3
    Join Date
    Apr 2006
    Location
    here, usually :)
    Posts
    25,123
    Downloads
    77
    Uploads
    8

    Re: Felt cupcakes with interchangeable toppings

    Very cute! I like the magnets better than velcro, which attracts all kinds of fuzz.

    To view links or images in signatures your post count must be 0 or greater. You currently have 0 posts.
    ~ kelly ~

    mom to Alex, Zoe and Jack

    my ISO:
    Snoopy Embroidery CDs
    dies for metal snaps to fit an OSDS press & 14/16 metal snaps

    Visit Sewing Mamas'
    To view links or images in signatures your post count must be 0 or greater. You currently have 0 posts.
    !
    Find Sewing Mamas on
    To view links or images in signatures your post count must be 0 or greater. You currently have 0 posts.
    !
    Tweet with
    To view links or images in signatures your post count must be 0 or greater. You currently have 0 posts.
    !
    Check out the Sewing Mamas
    To view links or images in signatures your post count must be 0 or greater. You currently have 0 posts.
    !

  4. #4
    Join Date
    Jan 2009
    Location
    Rochester, NY
    Posts
    8,250
    Downloads
    36
    Uploads
    2

    Re: Felt cupcakes with interchangeable toppings

    That is fantastic! Thanks for sharing!
    Jenn
    ~ full time working mom to a 7 yo dd, 9 yo ds, 11 yo ds, and 12 yo dd -- with a homeschooling dh!

    I (used to) blog at
    To view links or images in signatures your post count must be 0 or greater. You currently have 0 posts.


    To view links or images in signatures your post count must be 0 or greater. You currently have 0 posts.

    To view links or images in signatures your post count must be 0 or greater. You currently have 0 posts.
    by
    To view links or images in signatures your post count must be 0 or greater. You currently have 0 posts.
    , on Flickr

Posting Permissions

  • You may not post new threads
  • You may not post replies
  • You may not post attachments
  • You may not edit your posts
  •